
JavaScript Isometric Game Tutorial
This is a step-by-step guide to creating a simple isometric game with WADE and its isometric plug-in (wade.iso). You can download the full source code here.
1. Getting ready
Let's start by creating a new folder somewhere, and copying the WADE files into it. At the time of writing, the latest version of WADE is 1.0.2, so that's the one we're going to use. So download the zip file from clockwork chilli's website, and extract wade_1.0.2.js (or a newer version), index.html and style.css into your game folder. You are also going to need the latest version of the isometric plug-in for WADE, which you should extract into the same folder. I am also going to create an empty images sub-folder in here. Next, we are going to create a new, empty file in the game's folder, called iso.js, which is going to contain our game. Now let's edit index.html and add our physics plugin to it. After the line that says:
<script src="wade_1.0.2.js"></script>
We insert a new line like this (change the version number if you're using a newer version):
<script src="wade.iso_1.0.js"></script>
We should also change the line that says:
// wade.init('test.js');
To:
wade.init('iso.js');
And in iso.js we are going to create our WADE App. So:
    App = function()
    {
    };
Inside the App function, we are going to create load and init functions, like this:
    App = function()
    {
        this.load = function()
        {

        };

        this.init = function()
        {

        };
    };
2. Isometric map with pan and zoom
The first thing we want to do is initialize the isometric plug-in, so in our init function we call wade.iso.init():
    this.init = function()
    {
        wade.iso.init();
    };
We are calling this function with no paramters, so wade.iso is going to use default options for everything. We can already look at what it's doing, by navigating to index.html in a web browser. If everything is set up correctly, you should see something like the image below. If you don't see anything (or some errors come up), please make sure that you have followed this quick set up guide, to allow your browser to execute local scripts.
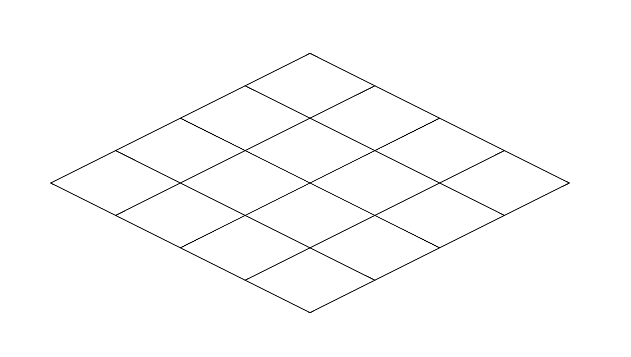
By default, the isometric plugin assumes that you want a 1x1 isometric map. I know you're thinking: "but that's a 4x4 map there!". In reality, it's a map that contains a single tile (so it's 1x1 tiles), but each tile, by default, contains 4x4 cells. What's the difference then? Why do we need to have tiles, and cells inside tiles?
This is because you can set a texture for each tile, so you don't need to have a texture per cell. Your game objects, on the other hand, will be occupying cells, not tiles. This system allows you to have higher-resolution textures for your tilemap, without having to be restricted to 1 texture per cell. However, if you wish, you can change the number of cells in a tile, even setting it to 1, effectively eliminating the distinction between tiles and cells. Or you could do the opposite, and have a single tile with all the cells that you need, using a single big background image. You could do this by passing an extra parameter to the init function like this:
wade.iso.init({numCellsPerTile: 3});
However for now we're going to keep the default value of 4. Before changing any of the paramters for wade.iso.init, we are going to add pan and zoom controls to our App. I am just going to copy and paste the code from one of Clockwork Chilli's snippets into our App function:
    this.onMouseDown = function(eventData)
    {
        // store coordinates when the mouse button is pressed (or when the screen is touched)
        this.mouseDownPosition = eventData.screenPosition;
        this.clickCameraPosition = wade.getCameraPosition();
    };

    // pan
    this.onMouseMove = function(eventData)
    {
        if (wade.isMouseDown())
        {
            // see how much we've moved since the onMouseDown event
            var dx = this.mouseDownPosition.x - eventData.screenPosition.x;
            var dy = this.mouseDownPosition.y - eventData.screenPosition.y;

            // update camera position
            var cameraPos = {x: this.clickCameraPosition.x + dx,
                             y: this.clickCameraPosition.y + dy,
                             z: this.clickCameraPosition.z};
            wade.setCameraPosition(cameraPos);
        }
    };

    // zoom
    this.onMouseWheel = function(eventData)
    {
        var cameraPos = wade.getCameraPosition();
        cameraPos.z -= eventData.value * 0.01;
        wade.setCameraPosition(cameraPos);
    };
So now you can click and drag to pan, and use the mouse wheel to zoom. Note that this works with touch-screen controls too (slide one finger to drag, pinch with two fingers to zoom), because WADE maps the mouse events to the appropriate touch events automatically. And now that we can freely move around, we can change the size of the isometric map: let's make it a 5x5 map (which means 20x20 cells):
wade.iso.init({numTiles: {x: 5, z: 5}});
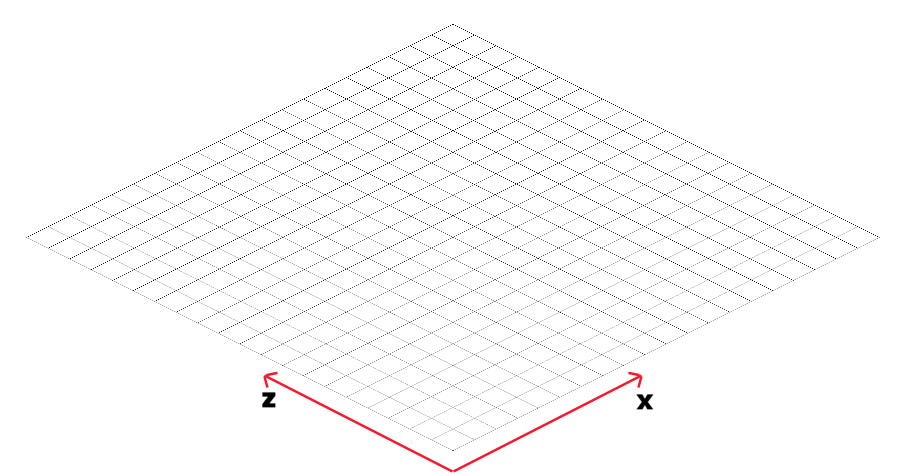
In the isometric plane we use x and z coordinates. Don't confuse it with the x and y coordinates of your screen, or of a regular WADE 2D world: this is a different coordinate system, with the x axis pointing up and right, and the z axis pointing up and left, as illustrated by the picture above. Whenever you use wade.iso functions, you will be using this coordinate system to identify cells and tiles on the grid. The cell at the very bottom is {x:0, z:0}.
3. Terrain textures
Now let's make our terrain prettier, by adding some textures. There are 3 different types of textures that you can use on your isometric terrain: tiles, transitions and details. You can load an isometric map file (which is a JSON file describing which terrain textures go where, and, if there are any game objects on the map, where they are and what they do). Or you can set textures directly in code. We are going to do just this for this sample game, but I'll mention how to load a map later on. Let's start by loading a texture to use for our terrain tiles. I've placed it in our images folder, calling it grass0.png. This is what the texture looks like:
So let's load it in our load function:
wade.loadImage('images/grass0.png');
Now let's change our init function so that, immediately after initializing the iso plug-in, we start using this texture on the whole terrain. This works by creating an object that contains the tile data (in this case it's just a texture, but it could also be an animation). Then we set this tile data to all the tiles in our terrain.
    this.init = function()
    {
        // initialize the isometric plugin
        var numTiles = {x: 5, z: 5};
        wade.iso.init({numTiles: numTiles});

        // fill the terrain with grass
        var tileData = {texture: 'images/grass0.png'};
        for (var i=0; i < numTiles.x; i++)
        {
            for (var j=0; j < numTiles.z; j++)
            {
                wade.iso.setTile(i, j, tileData);
            }
        }
    };
If you refresh the game page now, you'll see that each tile of our terrain is now using this texture, so it's repeated 5x5 times.
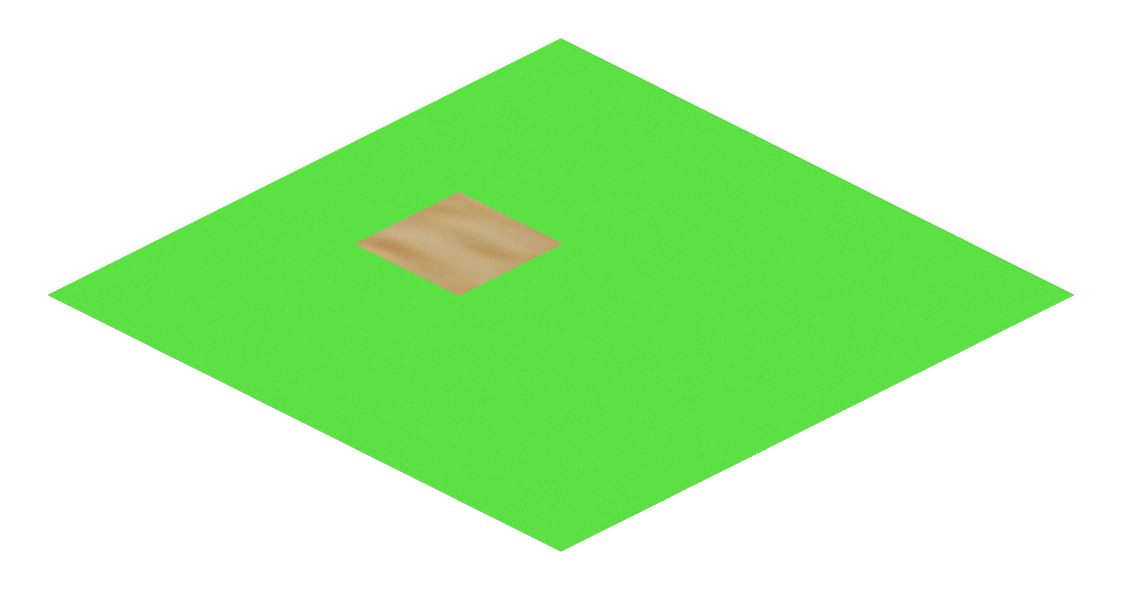
Using exactly the same method, let's load in a sand texture (sand0.png):
wade.loadImage('images/sand0.png');
And let's put it in just one of our terrain tiles, let's say the one located at {x: 2, z: 3}
    // add a bit of sand
    wade.iso.setTile(2, 3, {texture: 'images/sand0.png'});
As you can see, this looks a bit ugly, because there is a very visible seam between the two textures. Of course, we could have used a better texture: one where we have bits of grass around the edges, slowly transitioning into our sand texture. While this is theoretically possible, it's really impractical: consider how many possible shapes you would need for this type of textures (grass could be on 1 side only, or some sides, or all sides). Then consider what would happen if you had more than 2 textures: you would need to create separate textures for every bit of your terrain that changes from grass to sand, from grass to rock, from rock to sand, and so on.
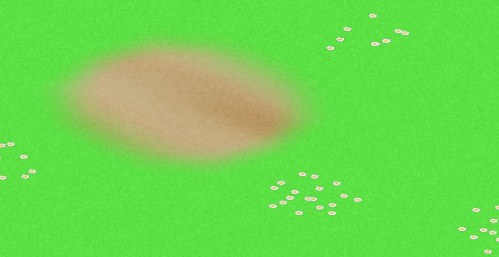
This is precisely why wade.iso allows you to use transition textures: these are textures that are overlaid on top of the tile textures, so that you can combine your terrain materials in a much easier way. For example, let's load grass0_allSides.png, which is a texture with grass on all sides, and nothing in the middle:
wade.loadImage('images/grass0_allSides.png');
Now let's use it as a transition texture on top of our sand texture at {x: 2, z: 3}:
wade.iso.setTransition(2, 3, {texture: 'images/grass0_allSides.png'});
Now this looks much more natural. Of course there are lots of different transition shapes that you can use, to create more complex and more interesting texturing, but I won't do that here... you understand how to do it anyway.
While this looks better, the terrain as a whole doesn't look great, because you can tell that we've just used the same texture, which is repeating many times. There is another terrain texturing layer that we can use to hide this fact: terrain details. This is essentially yet another texture layer that is used on top of tiles and transitions, but this time it's done per cell, not per tile. Let's load some more images: daisies0.png, daisies1.png, daisies2.png, and daisies3.png.
    wade.loadImage('images/daisies0.png');
    wade.loadImage('images/daisies1.png');
    wade.loadImage('images/daisies2.png');
    wade.loadImage('images/daisies3.png');
In init, after setting up our tiles and transitions, let's add some details. The idea here, is that we pick some random cell cells, and for each cell we pick a random daisy picture to set as a terrain detail:
    // add daisy patches
    var numCellsPerTile = wade.iso.getNumCellsPerTile();
    for (i=0; i < 50; i++)
    {
        var x = Math.floor(Math.random() * numTiles.x * numCellsPerTile);
        var z = Math.floor(Math.random() * numTiles.z * numCellsPerTile);
        var detailData = {texture: 'images/daisies' + Math.floor(Math.random() * 4) + '.png'};
        wade.iso.setDetail(x, z, detailData);
    }
This is a nice touch, that helps break the repetition of the grass tile. But while it looks great on our grass texture, on the sand texture it's a bit ugly. We can avoid adding daisies on the sand texture, just by asking wade.iso which tile texture is associated with a specific cell:
    if (wade.iso.getTileTextureAtCell(x, z) == 'images/grass0.png')
    {
        wade.iso.setDetail(x, z, detailData);
    }
Now, even though the daisies are placed in random positions, we can be sure that they won't appear on our sand surface. Remember that these are just terrain textures, not objects that the player is supposed to interact with in most games. It's a good idea to use these terrain details for things such as roads, flowers and generally anything that characters can freely walk over.
4. Simple isometric objects
This isometric game that we are making is still a normal WADE app, so you can add normal WADE SceneObjects to it. You should probably do this for UI elements, but not for objects that you expect to interact with your isometric world: you should create, delete and access these objects through the wade.iso plugin. Always.
We are going to start by creating some simple isometric objects: plants. These are simple because are made by a single sprite with no animations, and are going to occupy a single cell on the isometric grid. I am going to load yet another image: plant.png.
wade.loadImage('images/plant.png');
Let's create one of these plants to see what it looks lke. As a test, I'm going to create a single one in cell {x: 3, z: 3}. I need to call wade.iso.createGameObject and pass it an objectData parameter as well as the position of the plant. This objectData parameter determines what the plant looks like. For now we are setting only its sprites field: you could use an array of sprites here (which is why it's called sprites with an s), but in this simple case we are just going to use a single sprite, using this plant.png file we just loaded.
    // create a plant
    var plantData = {sprites: {image: 'images/plant.png'}};
    wade.iso.createObject(plantData, {x:3, z: 3});
It's nice, but way too big! Let's make it smaller by changing its scale factor in the object data:
var plantData = {sprites: {image: 'images/plant.png', scale: 0.4}};
While the size is correct now, the plant still isn't in the right place. It's a bit hard to see it with the grass texture, but if we remove the terrain texture and just look at the grid, we can easily see this (I have highlighted the cell where the object is supposed to be in red):
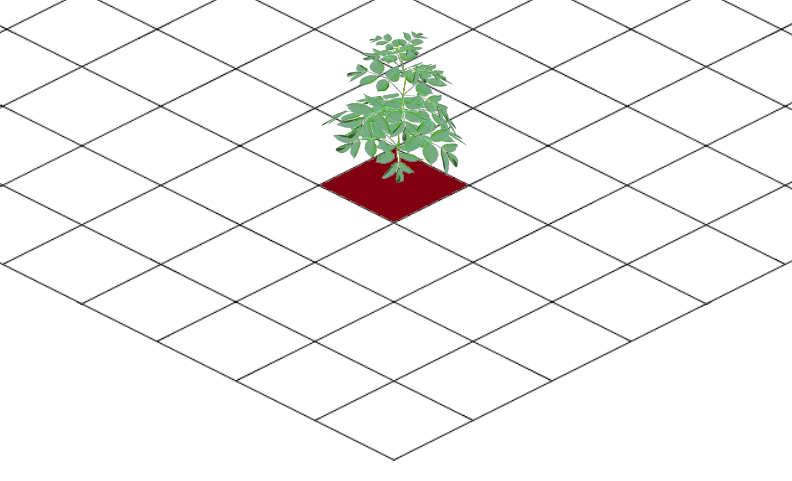
The position is slightly wrong because wade.iso assumes that you want the center-bottom point of your sprite in the middle of the cell - and this is true in most cases, for characters for example, where you want their feet to be in the middle of the cell. However, for this plant, the center-bottom of the sprite isn't the center-bottom of the stem, so we'll need to add an offset on the y axis. It's easy to do this, simply by specifying a value (that's relative to the sprite size, so a fractional value) in the plant data:
var plantData = {sprites: {image: 'images/plant.png', scale: 0.4, offset: {y: 0.22}}};
And now the plant appears to be exactly where it should be, in the middle of its cell. We are now ready to create a few more around the map:
    // create some plants
    var plantData = {sprites: {image: 'images/plant.png', scale: 0.4, offset: {y: 0.22}}};
    var plantPositions = [{x: 1, z: 2}, {x: 4, z: 9}, {x: 7, z: 4}, {x: 13, z: 6}, {x: 17, z: 13}, {x: 2, z: 16}, {x: 9, z: 17}];
    for (i=0; i < plantPositions.length; i++)
    {
        wade.iso.createObject(plantData, plantPositions[i]);
    }
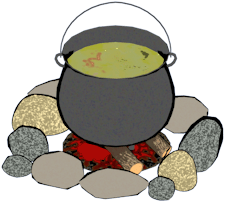
Now let's make another object, in much the same way. This time I'm going to load in cauldron.png:
wade.loadImage('images/cauldron.png');
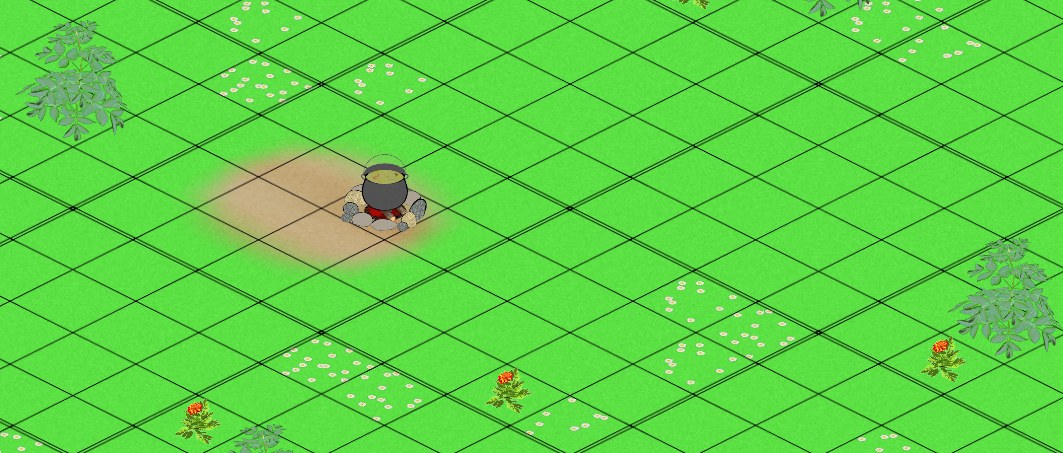
And now we're going to create a cauldron on our sandy patch, at coordinates {x: 10, z:13}. This time there is a difference: this is a "special" object, that we want to reference later on in the game (to do things such as walking towards the cauldron, etc). So, to be able to identify it, we pass an extra parameter to wade.iso.createObject: this extra parameter represents some data that we want associated with the instance of the object that we are creating (as opposed to the object data, which is data that applies to all the objects of a the same type). In this case, we want to set the name property of the object to 'cauldron', so that later on we can do wade.getSceneObject('cauldron') to retrieve this object.
    // create a cauldron
    var cauldronData = {sprites: {image: 'images/cauldron.png', scale: 0.4, offset: {y: 0.3}}};
    wade.iso.createObject(cauldronData, {x: 10, z: 13}, {name: 'cauldron'});
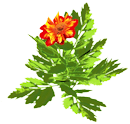
Now let's add some more objects. I'm loading yet another image (flower.png):
wade.loadImage('images/flower.png');
And I'm going to create some flowers, again in the same way. This is a slightly different case however - like the cauldron, we want to be able to interact with these objects in our game. We could give them names, but names need to be unique: we could call them flower0, flower1 and so on. However, in the instance data, we can set any properties that we like, and they will be transfered to the scene object once it's created. The name property is a special case, because it's used to set the name of the object, and therefore has to be unique. But we could set an isFlower property for example, so later on we can check this flag by looking at object.isFlower.
    // create some flowers
    var flowerData = {sprites: {image: 'images/flower.png', scale: 0.4, offset: {y: 0.4}}};
    var flowerPositions = [{x: 5, z: 3}, {x: 8, z: 9}, {x: 12, z: 6}, {x: 16, z: 14}, {x: 5, z: 11}];
    for (i=0; i < flowerPositions.length; i++)
    {
        wade.iso.createObject(flowerData, flowerPositions[i], {isFlower: true});
    }
I know that you must be thinking: how do you set these offsets that are different for each object? It's impossible to see where they are in the cell once we are using terrain textures... do you really have to comment out the code that creates all the terrain textures to see the grid? Of course not! There is a nice debug feature that you can use: wade.iso.drawGrid() and wade.iso.drawGrid(false) (to turn it off). You can type this in the browser's console, or bind it to a key press while developing, to make it easier to place all your objects correctly.
5. Complex isometric objects
So far we've been adding very simple objects, but there is more that we can do with wade.iso. For example, let's add an animated isometric object. I'm going to load a spritesheet (8x4 frames of animation), called smoke.png.
wade.loadImage('images/smoke.png');
Adding a more complex object such as this one to our isometric world isn't much different: it's the same principle, just a slightly more complex structure for the object data that now has to take animations into account:
    // create some smoke
    var smokeData =
    {
        sprites:
        {
            size: {x: 90, y: 120},
            offset: {y: 0.3},
            animations:
            {
                image: 'images/smoke.png',
                numCells: {x: 8, y: 4},
                looping: true,
                speed: 10
            }
        }
    };
    wade.iso.createObject(smokeData, {x:11, z: 14});
Note that I'm creating this smoke object at {x:11, z: 14}, which is directly above the cauldron. I could have created it in the same cell as the cauldron, and that would have been fine. However, a little bit later in this tutorial, we are going to add collisions to the cauldron, and a cell that is occupied by an object with collisions cannot contain anything else. To make the smoke look like it's on the same cell as the cauldron, I've just set an offset for it on the Y axis.
Now if you look closely (but really, really closely... zoom waaaay in), you'll notice that the smoke appears behind the cauldron. This is happening because, technically, the smoke is behind the cauldron (we've put it there), and wade.iso makes sure that things that are closer to the viewer appear in front of things that are farther away, and it sorts all your sprites to do that. This is fine in 99% of cases (and in fact, it may have been acceptable even here, but let's say that is isn't acceptable, just to prove a point). Here we want the smoke to appear on top of the cauldron, not the other way around. We can do this by changing the smoke's (or the cauldron's) sort point, which is the point, relative to the sprite's center and size, that wade.iso uses to determine the order of the sprites. Let's add this to the sprites field of the smoke data:
sortPoint: {y: 1},
And now the smoke appears in front of the cauldron. It's made a very small difference in this case, but it can be a useful thing to keep in mind: when things don't appear in the correct order, change their sort points (the y value of the sort point in particular).
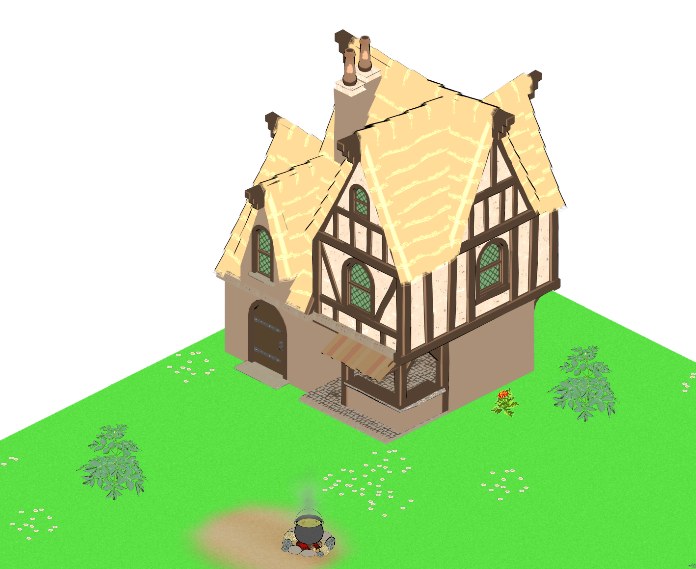
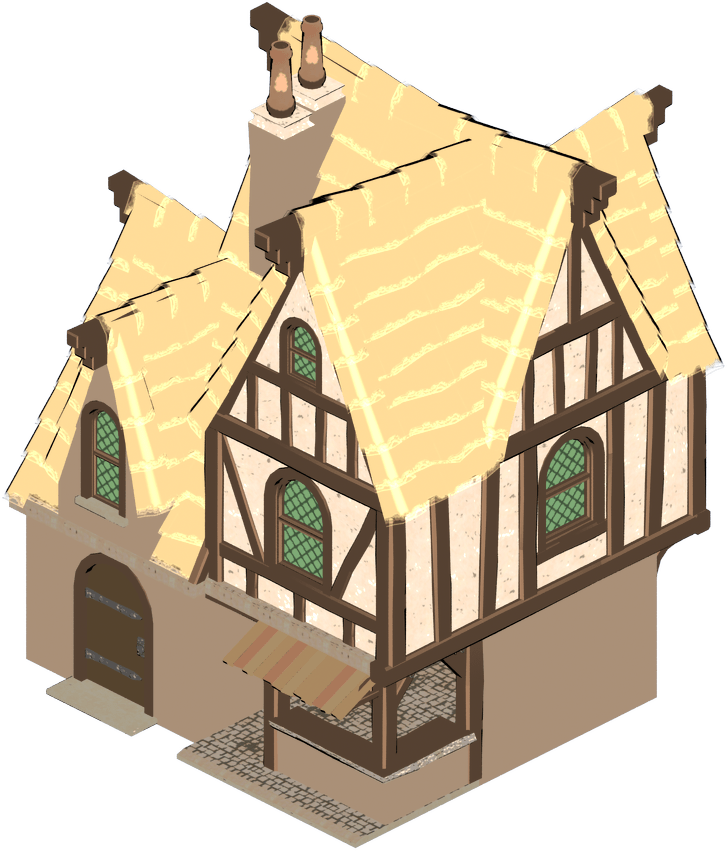
Now that we have a smoking cauldron, let's go on to add a bigger object, such as a house. Let's load house.png:
wade.loadImage('images/house.png');
Creating the house is the same as creating any other object, but since this time our object is going to occupy several grid cells, we should tell wade.iso how big it is. This can be done in a couple of ways: with a gridMap parameter, or with a gridSize parameter. Note that they are both parameters to pass into the object data, not the sprite data. A gridMap is an array of coordinates, that represent which cells are occupied by the object (relative to where the object is positioned), like this:
[{x:0, z:0}, {x:1, z:0}, {x:2, z:0}]
In the above example, we have described an object that occupies 3 cells, so that if the object is created at {x:10, z:10}, then the cells it occupies are {x:10, z:10}, {x:11, z:10} and {x:12, z:10}. This house that we are going to create now is going to occupy a 5x5 space (so 25 cells). Since it's a regular (i.e. rectangular) shape, instead of explicitly writing down an array of 25 offsets, we can just use the gridSize property, that makes things simpler. So to create our house we can do something like this:
    // create a house
    var houseData =
    {
        sprites:
        {
            image: 'images/house.png',
            scale: 0.8,
            offset: {x: 0.01, y: 0.05},
            sortPoint: {y: 0.27}
        },
        gridSize: {x: 5, z: 5}
    };
    wade.iso.createObject(houseData, {x:11, z: 15});
That's a nice, big house!
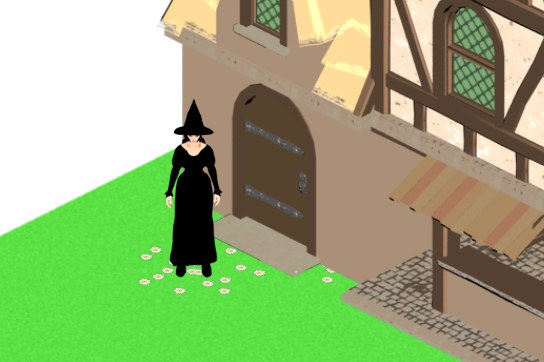
6. Isometric Characters
Now let's make our simple game much more interesting by adding an animated character. We are going to need quite a few animations, especially because we want to support 8 movement directions. This isn't mandatory (you could decide to support only the 4 diagonal movements, or only the 4 straight movements). To start with, let's just load some pictures to use when the witch is idle (one for each possible direction):
    wade.loadImage('images/witch_Idle_iso_e.png');
    wade.loadImage('images/witch_Idle_iso_n.png');
    wade.loadImage('images/witch_Idle_iso_s.png');
    wade.loadImage('images/witch_Idle_iso_w.png');
    wade.loadImage('images/witch_Idle_iso_ne.png');
    wade.loadImage('images/witch_Idle_iso_nw.png');
    wade.loadImage('images/witch_Idle_iso_se.png');
    wade.loadImage('images/witch_Idle_iso_sw.png');
Actually, let's do this in a more elegant way:
    var directions = ['n','s','w','e','ne','nw','se','sw'];
    for (var i=0; i < directions.length; i++)
    {
        wade.loadImage('images/witch_Idle_iso_' + directions[i] + '.png');
    }
You can get all these images as part of this zip file that contains the source code and assets for this sample game.
And now, in init, let's create a witch as a sprite with a single animation (just as a test, to see what she looks like). Those idle pictures aren't actually animations, but we will treat them as single-frame animations for convenience (you'll soon see why it's convenient to do it this way):
    // create a witch
    var witchData =
    {
        sprites:
        {
            scale: 0.57,
            offset: {y: 0.05},
            animations:
            {
                name: 'Idle_iso_s',
                image: 'images/witch_Idle_iso_s.png'
            }
        }
    };
    wade.iso.createObject(witchData, {x: 13, z: 18});
She is looking very good, so let's go ahead and replace the animations field in the witch data with an array of animations, using all of our idle images. Note that we are using images of different sizes for different directions: i.e. the image of the witch standing and looking south is longer and thinner than the image of the witch standing and looking east. If we want to use both images and animations of the same sprite, we have to set the autoResize flag of the animation to true. This ensures that the sprite is resized when an animation is played (instead of the default behavior which is resizing the playing animation to fit the sprite's size) so that the witch always appears to be the correct size.
    animations:
    [
        { name: 'Idle_iso_s',   image: 'images/witch_Idle_iso_s.png',   autoResize: true },
        { name: 'Idle_iso_e',   image: 'images/witch_Idle_iso_e.png',   autoResize: true },
        { name: 'Idle_iso_n',   image: 'images/witch_Idle_iso_n.png',   autoResize: true },
        { name: 'Idle_iso_w',   image: 'images/witch_Idle_iso_w.png',   autoResize: true },
        { name: 'Idle_iso_se',  image: 'images/witch_Idle_iso_se.png',  autoResize: true },
        { name: 'Idle_iso_sw',  image: 'images/witch_Idle_iso_sw.png',  autoResize: true },
        { name: 'Idle_iso_ne',  image: 'images/witch_Idle_iso_ne.png',  autoResize: true },
        { name: 'Idle_iso_nw',  image: 'images/witch_Idle_iso_nw.png',  autoResize: true }
    ]
In fact, it's a good time to do the same thing with some walking animations:
    for (var i=0; i < directions.length; i++)
    {
        wade.loadImage('images/witch_Idle_iso_' + directions[i] + '.png');
        wade.loadImage('images/witch_Walk_iso_' + directions[i] + '.png');
    }
And the animations array now looks like this (it's slightly more complicated to take into account the number of frames in each spritesheet, and looping animations):
    animations:
    [
        { name: 'Idle_iso_s',   image: 'images/witch_Idle_iso_s.png',   autoResize: true },
        { name: 'Idle_iso_e',   image: 'images/witch_Idle_iso_e.png',   autoResize: true },
        { name: 'Idle_iso_n',   image: 'images/witch_Idle_iso_n.png',   autoResize: true },
        { name: 'Idle_iso_w',   image: 'images/witch_Idle_iso_w.png',   autoResize: true },
        { name: 'Idle_iso_se',  image: 'images/witch_Idle_iso_se.png',  autoResize: true },
        { name: 'Idle_iso_sw',  image: 'images/witch_Idle_iso_sw.png',  autoResize: true },
        { name: 'Idle_iso_ne',  image: 'images/witch_Idle_iso_ne.png',  autoResize: true },
        { name: 'Idle_iso_nw',  image: 'images/witch_Idle_iso_nw.png',  autoResize: true },
        { name: 'Walk_iso_e',   image: 'images/witch_Walk_iso_e.png',   autoResize: true,   numCells: {x: 4, y: 4}, looping: true },
        { name: 'Walk_iso_n',   image: 'images/witch_Walk_iso_n.png',   autoResize: true,   numCells: {x: 8, y: 2}, looping: true },
        { name: 'Walk_iso_w',   image: 'images/witch_Walk_iso_w.png',   autoResize: true,   numCells: {x: 4, y: 4}, looping: true },
        { name: 'Walk_iso_s',   image: 'images/witch_Walk_iso_s.png',   autoResize: true,   numCells: {x: 8, y: 2}, looping: true },
        { name: 'Walk_iso_se',  image: 'images/witch_Walk_iso_se.png',  autoResize: true,   numCells: {x: 8, y: 2}, looping: true },
        { name: 'Walk_iso_sw',  image: 'images/witch_Walk_iso_sw.png',  autoResize: true,   numCells: {x: 8, y: 2}, looping: true },
        { name: 'Walk_iso_ne',  image: 'images/witch_Walk_iso_ne.png',  autoResize: true,   numCells: {x: 8, y: 2}, looping: true },
        { name: 'Walk_iso_nw',  image: 'images/witch_Walk_iso_nw.png',  autoResize: true,   numCells: {x: 8, y: 2}, looping: true }
    ]
So now we've set up this character with a lot of animations. But how do we use them? Well, the first thing to do, is to add an extra field to our witchData, to make it use the IsoCharacter behavior that comes with wade.iso:
behaviors: IsoCharacter
Then we want to be able to access this behavior comfortably from anywhere in our App, so we can declare a witch variable at the top of the App function:
var witch;
And when we create the witch object, we assign its IsoCharacter behavior to this variable:
witch = wade.iso.createObject(witchData, {x: 13, z: 18}, {name: 'witch'}).getBehavior();
Then let's move the camera so that it is somewhere where we can see the witch and the cauldron without having to pan and zoom our way to them. Let's say above cell {x: 13, z: 16}
    // set initial camera position
    var pos = wade.iso.getWorldCoordinates(13, 16);
    pos.z = 1;
    wade.setCameraPosition(pos);
Now we're ready to use this character! Let's wait half a second after the game is loaded, then we make her walk to the cauldron:
    // start moving after 500 milliseconds
    setTimeout(function()
    {
        witch.goToObject('cauldron');
    }, 500);
It's a good time to look at it in your browser. This is pretty cool already, but there are a couple of problems with this movement. First of all, the witch is literally moving into the cauldron, i.e. into the same cell as the cauldron. This is what we have told her to do, and in fact we could have used a different function, such as wade.iso.moveObjectToCell to make her go to a specific cell near the cauldron. But there is a better way of doing this, which is adding collisions to both the witch and the cauldron, so they can never end up in the same cell. Let's edit our witchData object to add this field:
collisionMap: [{x: 0, z: 0}]
And let's do exactly the same with our cauldronData. Now refresh the page and you'll see that she's walking to a cell near the cauldron, as she is no longer allowed to go to the same cell. It's a good idea to add that same collisionMap line to our plantData too. And what about the houseData? We want our house to have collisions too, but it's a larger object, so we would have to create a large collisionMap. Luckily it's a rectangualr shape, so we can do the same thing that we did with its gridMap, and simply specify a collisionSize parameter for it:
collisionSize: {x: 5, z: 5}
Of course this doesn't really matter right now, but it will do in a minute, when we let our player take control of the witch to move her around the map. For now, let's just focus on the witch's movement as she walks to this cell by the cauldron. The problem is that, although she is finding a valid path to go there, it doesn't look like she's finding the shortest path to go there. This is because her movement is restricted to diagonals, which is the default movement type in wade.iso. This means that, at any point, she can be facing north-east, nort-west, south-east, or south-west. But never north, east, south and west. This is possibly the most common behavior in most isometric games, and it's a good option to consider if you are concerned about bandwidth and memory usage, because you need only 4 directions for each character animation (as opposed to 8). But we do have 8 directions for our walk and idle animations here, so let's use them! When we initialize wade.iso, we should an extra parameter called movementDirection:
wade.iso.init({numTiles: numTiles, movementDirection: 'both'});
And now she walks south a bit, before heading south-east. This is the optimal path to her destination, using 8 movement directions.
7. The flow of events
Let's say that we want the witch to say something when she reaches the cauldron. First of all, let's load an image to use as a speech bubble:
wade.loadImage('images/callout.png');
At the top of App we declare a variable for it:
wade.loadImage('images/callout.png');
Then in init we create a speechBubble object, putting its sprites on Layer 3 (which I'm going to use as an UI layer). Note that this is a regular WADE SceneObject, not an isometric object. I'm not adding this object to the scene just yet. But I am setting the layer transform for layer 3, to make sure that it doesn't move with the camera. This means that the coordinate system for objects on layer 3 is not the same as the coordinate system of isometric object: when we move the camera, objects on layer 3 won't move on the screen, while other objects will.
    // create a speech bubble
    speechBubble = new SceneObject(new Sprite('images/callout.png', 3));
    speechBubble.addSprite(new TextSprite('', '16px Verdana', 'black', 'left', 3), {x: -100, y: -30});
    wade.setLayerTransform(3, 0, 0);
Now let's extend our witch object (which is actually the witch's behavior) with a talk function, just after creating the witch herself. In this function, essentiallly, we are just going to add this speech bubble to the scene, with some text. Additionally, we set a timeout to remove the object from the scene after a set time:
    // add a talk function to our witch
    witch.talk = function(text, time)
    {
        // if we're talking already, cancel the talk timeout
        if (witch.talkTimeout)
        {
            clearTimeout(witch.talkTimeout);
        }

        // set text
        speechBubble.getSprite(1).setText(text);

        // add bubble to the scene
        if (!speechBubble.isInScene())
        {
            wade.addSceneObject(speechBubble);
        }

        // set a timeout to hide the bubble
        witch.talkTimeout = setTimeout(function()
        {
            wade.removeSceneObject(speechBubble);
            witch.talkTimeout = 0;
        }, time);
    };
Now let's also add a main loop function where we can control what happens for every frame in our game. For now we are just going to do one thing: move the speech bubble so it's always near the witch. We need to get the witch's coordinates in world space, then transform them into screen space (screen space is, essentially, the coordinate system of our UI layer, since it doesn't move with the camera). Then we use these coordinates to place our speech bubble. Let's do this at the bottom of init:
    // define what we want to do for every frame
    wade.setMainLoopCallback(function()
    {
        // move the speech bubble so it's always in the same position relative to the witch
        var pos = wade.getSceneObject('witch').getPosition();
        pos.y -= 90;
        pos.x -= 20;
        pos = wade.worldPositionToScreen(wade.iso.getObjectsLayerId(), pos);
        pos.y -= 120;
        pos.x -= 60;
        speechBubble.setPosition(pos);
    }, 'myMainLoop');
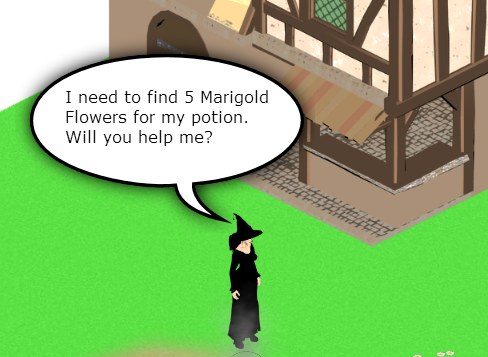
Finally, let's make our witch actually talk once she's reached the cauldron. How do we do that? Easy! By responding to an onObjectReached event:
    // do something upon reaching an object
    witch.onObjectReached = function(eventData)
    {
        if (eventData.object.getName() == 'cauldron')
        {
            witch.talk('I need to find 5 Marigold\nFlowers for my potion.\nWill you help me?', 4000);
        }
    };
In reality, it's a good idea to avoid interfering with the witch behavior and how it handles events: that's what we are doing here, because the witch variable actually represents the witch's behavior. It's better to add the event handler to the object directly (or perhaps add another behavior to the object and put all your event handlers there, that's up to you). Let's rewrite it this way:
    // do something upon reaching an object
    witch.owner.onObjectReached = function(eventData)
    {
        if (eventData.object.getName() == 'cauldron')
        {
            witch.talk('I need to find 5 Marigold\nFlowers for my potion.\nWill you help me?', 4000);
        }
    };
It's the same thing, but the onObjectReached function that we are defining is now a property of the witch SceneObject, not of its IsoCharacter behavior. It's just a little bit tidier and safer (in case the IsoCharacter behavior had already defined an event handler for that type of event).
In this same function, upon reaching the cauldron, we are also going to set a flag, that we shall call canMove, on the witch's behavior:
    if (eventData.object.getName() == 'cauldron')
    {
        witch.talk('I need to find 5 Marigold\nFlowers for my potion.\nWill you help me?', 4000);
        witch.canMove = true;
    }
Now let's add an onClick function to our App:
    // move the witch
    this.onClick = function(eventData)
    {
        if (witch.canMove)
        {
            var worldCoords = wade.screenPositionToWorld(wade.iso.getTerrainLayerId(), eventData.screenPosition);
            var cellCoords = wade.iso.getCellCoordinates(worldCoords.x, worldCoords.y);
            if (cellCoords.valid)
            {
                witch.setDestination(cellCoords);
            }
        }
    };
And since we want this to work well on mobiles too, let's just increase the click tolerance to something like 15 pixels (so a click will register even if the mouse/finger has moved as much as 15 pixels from the mouseDown to the mouseUp). We can do this at the top of init
wade.setClickTolerance(15);
Now let's go back to where we created our flowers, and let's make them clickable, like so:
    for (i=0; i < flowerPositions.length; i++)
    {
        var flower = wade.iso.createObject(flowerData, flowerPositions[i], {isFlower: true});
        flower.onClick = function()
        {
            if (witch.canMove)
            {
                witch.goToObject(this);
            }
            return true;
        };
        wade.addEventListener(flower, 'onClick');
    }
Note that the flower's onClick function is returning true. This is important to stop the click event propagating to the App object, where it would be handled by the App's onClick function.
Now it would be good to play an animation, when the witch reaches a flower, with the witch crouching to pick it up. However we don't really want to load a further 8 spritesheets, considering that this animation can be played from any angle (the witch could reach the flower from the right, from the left and so on). Instead, let's change the flower data to add an interactionOffset parameter. This says where a character shuould try to go when it's told to move to an object on the map. If we set this to {x: -1, z: 0}, then the witch will always try to go to the south-west of the flowers, which means that we can add a single spritesheet animation for picking it up (which is the animation where the witch is facing north-east).
var flowerData = {sprites: {image: 'images/flower.png', scale: 0.4, offset: {y: 0.4}}, interactionOffset: {x: -1, z: 0}};
So let's load the appropriate animation spritesheet:
wade.loadImage('images/witch_Crouch_iso_ne.png');
Let's add it to the array of animations for the witch:
{ name: 'Crouch_iso_ne',image: 'images/witch_Crouch_iso_ne.png',autoResize: true, numCells: {x: 3, y: 3} }
Let's also add another variable, just after creating our flowers, to keep track of how many flowers are left on the map:
var numFlowersLeft = flowerPositions.length;
Then we can change the onObjectReached function of the witch object, to play this animation when she's reached a flower. Remember that isFlower flag that we set in the flower instance data? It's time to use it:
    // do something upon reaching an object
    witch.owner.onObjectReached = function(eventData)
    {
        if (eventData.object.getName() == 'cauldron')
        {
            witch.talk('I need to find 5 Marigold\nFlowers for my potion.\nWill you help me?', 4000);
            witch.canMove = true;
        }
        if (eventData.object.isFlower)
        {
            witch.owner.playAnimation('Crouch_iso_ne', 'ping-pong');
            witch.canMove = false;
            setTimeout(function()
            {
                wade.iso.deleteObject(eventData.object);
                numFlowersLeft--;
            }, 300);
        }
    };
As you can see we play the crouch animation in ping-pong mode (to make the witch stand up after crouching), and we stop the witch from moving. After 300 milliseconds we delete the flower. It is important to delete it through wade.iso, since it was created through wade.iso.
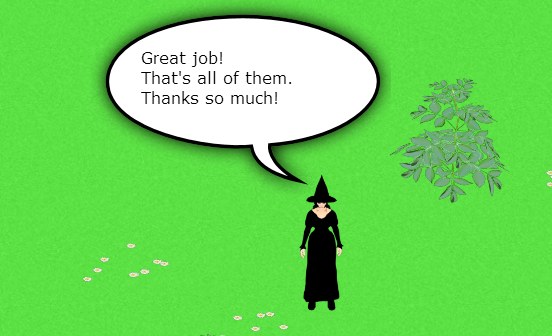
Then we want to do something else when the animation is finished playing. We can do this by adding an onAnimationEnd function to the witch object. In this function we are going to set the canMove flag to true, we are telling the witch to face south and to say something:
    // What to do when the witch is finished playing an animation
    witch.owner.onAnimationEnd = function(eventData)
    {
        if (eventData.name == 'Crouch_iso_ne')
        {
            // face south
            witch.setDirection('s');

            // say something
            var text = (numFlowersLeft? 'Excellent! Only ' + numFlowersLeft + '\nmore to go!' : "Great job!\nThat's all of them.\nThanks so much!");
            witch.talk(text, 3000);

            // feel free to move again
            witch.canMove = true;
        }
    };
8. Let's make it look nicer
Our simple isometric game can be played and is fully functional, however it's still a bit rough around the edges. Let's make it look nicer. We can start by adding a background color. You could do this with a background sprite that covers the whole screen but remember that essentially we are creating a web page, so there is an easier way: set the background color of the body in the CSS style sheet! Let's open style.css and add this to the html, body block at the top:
background: #1c6ea7;
Now back to our main App script, where we extend the terrain to make it a little big bigger (6x6 tiles instead of 5x5).
var numTiles = {x: 6, z: 6};
Let's load two more images, that are transition tiles to put around the edges and corners of the map:
    wade.loadImage('images/beach.png');
    wade.loadImage('images/beach_corner.png');
Now we can add these transitions around the edges. Let's start with the north-west edge:
    // set transitions around the edges
    for (i=1; i < numTiles.x-1; i++)
    {
        wade.iso.setTransition(i, numTiles.z-1, {texture: 'images/beach.png'});
    }
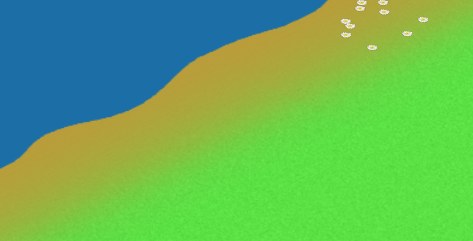
It's a nice transition effect, but how can we apply it to the other edges? Do we need more images? Luckily no, we don't: we can simply rotate the image that we have by adding a rotation parameter to the tile data. So for the north-east edge, we can set the rotation to 1 (this indicates a 90 degrees rotation clock-wise), for the south-east edge we set the rotation to 2 and for the south-west edge we set it to 3:
    // set transitions around the edges
    for (i=1; i < numTiles.x-1; i++)
    {
        wade.iso.setTransition(i, numTiles.z-1, {texture: 'images/beach.png'});
    }
    for (i=1; i < numTiles.z-1; i++)
    {
        wade.iso.setTransition(numTiles.x-1, i, {texture: 'images/beach.png', rotation: 1});
    }
    for (i=1; i < numTiles.x-1; i++)
    {
        wade.iso.setTransition(i, 0, {texture: 'images/beach.png', rotation: 2});
    }
    for (i=1; i < numTiles.z-1; i++)
    {
        wade.iso.setTransition(0, i, {texture: 'images/beach.png', rotation: 3});
    }
Now we have to take care of the corners, in much the same way:
    // transitions for the corners
    wade.iso.setTransition(numTiles.x-1, numTiles.z-1, {texture: 'images/beach_corner.png'});
    wade.iso.setTransition(numTiles.x-1, 0, {texture: 'images/beach_corner.png', rotation: 1});
    wade.iso.setTransition(0, 0, {texture: 'images/beach_corner.png', rotation: 2});
    wade.iso.setTransition(0, numTiles.z-1, {texture: 'images/beach_corner.png', rotation: 3});
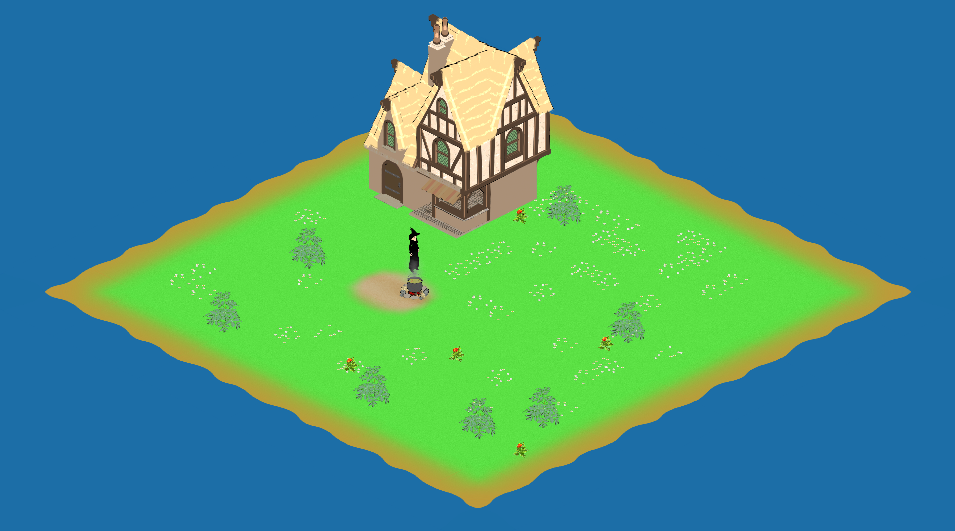
We want to change where some objects are too, now that we've added some water. Let's start with the daisies: we don't want them on the outer tiles, so let's change how we choose their posisionts:
    var x = Math.floor(Math.random() * (numTiles.x - 2) * numCellsPerTile) + numCellsPerTile;
    var z = Math.floor(Math.random() * (numTiles.z - 2) * numCellsPerTile) + numCellsPerTile;
And there's also a plant or two that need moving:
var plantPositions = [{x: 5, z: 5}, {x: 4, z: 9}, {x: 7, z: 4}, {x: 13, z: 6}, {x: 17, z: 13}, {x: 4, z: 16}, {x: 9, z: 17}];
Now we have pretty good looking island that is so much better than a boring white background!
We still have to restrict the movement of our witch, now that we've added some water. So let's make sure that's she's always at least 2 cells from any edge of the map. Let's change our App's onClick function:
    if (witch.canMove)
    {
        var worldCoords = wade.screenPositionToWorld(wade.iso.getTerrainLayerId(), eventData.screenPosition);
        var cellCoords = wade.iso.getCellCoordinates(worldCoords.x, worldCoords.y);
        var numCells = wade.iso.getNumCells();
        if (cellCoords.x >= 2 && cellCoords.z >= 2 && cellCoords.x < numCells.x - 2 && cellCoords.z < numCells.z - 2)
        {
            witch.setDestination(cellCoords);
        }
    }
Another thing that we could improve, is the fact that sometimes the speech bubble can appear outside the screen (depending on where we are looking). So before telling the witch to speak, we should move the camera to make sure that the speech bubble is going to be visible. In fact, let's take this opportunity to use the speech bubble to tell our player that they can pan and zoom around the map.
    // if the bubble isn't near the center of the screen, move the camera
    var text = (numFlowersLeft? 'Excellent! Only ' + numFlowersLeft + '\nmore to go!' : "Great job!\nThat's all of them.\nThanks so much!");
    if (numFlowersLeft == 4)
    {
        text = 'You can pan and zoom\naround the map';
    }
    var pos = speechBubble.getPosition();
    var screenWidth = wade.getScreenWidth();
    var screenHeight = wade.getScreenHeight();
    if (Math.abs(pos.x) - screenWidth / 2 < screenWidth / 4 || Math.abs(pos.y) - screenHeight / 2 < screenHeight / 4)
    {
        pos = wade.screenPositionToWorld(wade.iso.getObjectsLayerId(), pos);
        pos.z = wade.getCameraPosition().z;
        wade.moveCamera(pos, 300);
        wade.app.onCameraMoveComplete = function()
        {
            // say something
            witch.talk(text, 3000);
            // feel free to move again
            witch.canMove = true;
        };
    }
    else
    {
        // say something
        witch.talk(text, 3000);
        // feel free to move again
        witch.canMove = true;
    }
Also, when the user clicks in a valid position and we start moving there, we could show some sort of particle effect. Let's load a 4x4 spritesheet with this particle effect:
wade.loadImage('images/cursor.png');
And in the App's onClick function, where we move the witch, we can do this (since setDestination return true only if a valid destination is being set):
    if (witch.setDestination(cellCoords))
    {
        // show a particle effect
        var sprite = new Sprite(null, wade.iso.getObjectsLayerId());
        var animation = new Animation('images/cursor.png', 4, 4, 30);
        sprite.addAnimation('cursor', animation);
        sprite.setSize(100, 50);
        var cursor = new SceneObject(sprite, 0, worldCoords.x, worldCoords.y);
        wade.addSceneObject(cursor);
        sprite.pushToBack();
        cursor.playAnimation('cursor');
        cursor.onAnimationEnd = function()
        {
            wade.removeSceneObject(cursor);
        }
    }
We should do exactly the same when picking up a flower. Let's load one more spritesheet
wade.loadImage('images/sparkle.png');
And let's use it when we pick up a flower
    // show a particle effect
    var sprite = new Sprite(null, wade.iso.getObjectsLayerId());
    var animation = new Animation('images/sparkle.png', 8, 4, 30);
    sprite.addAnimation('sparkle', animation);
    sprite.setSize(100, 100);
    var pos = eventData.object.getPosition();
    var sparkle = new SceneObject(sprite, 0, pos.x, pos.y);
    wade.addSceneObject(sparkle);
    sparkle.playAnimation('sparkle');
    sparkle.onAnimationEnd = function()
    {
        wade.removeSceneObject(sparkle);
    };
Another thing to improve is the zooming behavior: it should be faster, and we should set a maximum zoom level. Let's say that when the camera's z coordinate is less that 0.4 we stop zooming in. So in our App's onMouseWheel function:
cameraPos.z = Math.max(0.4, cameraPos.z - eventData.value * 0.05);
And finally, there's one last thing that I'd like to add: a simple loading screen. We are loading a lot of images, so it may take some time for the game to start. Let's go to the top of our load function to set a loading image to show while loading:
wade.setLoadingImages('images/loading.png');
And that's it! We have a fairly simple, but complete and nicely polished isometric game.
9. A note about maps
A lot of the code we have written for this sample game is, in fact, just data structures to define the properties of our terrain and our objects (their size, position, and so on). You may be wondering if there is a way to load all this data as part of a map file. Yes, there is a way, and you can pass a map parameter to wade.iso.init(). We are still working on a map editor to make it easy for you to save and load map data. If you want to look at an example map however, you can download this json file. If you have followed this step-by-step guide you will know what the fields mean.
The main idea is that there are "data" objects (like we have used for tile data, transition data, detail data and object data), and these objects have unique id's. Then there are fields in the JSON file that describe which data object id is being used at any one place on the terrain. But if you have a look at the map file it's going to be easier than reading this explanation.
I hope you'll enjoy making your own isometric HTML5 games with wade.iso!

