
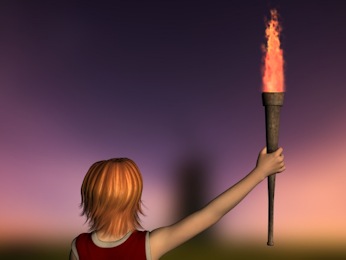
Fire is a useful effect in many games. In this post we will make some nice animated fire using a shader and a single texture.
Our shader requires a fairly complex texture, so we will look at how it was made, and how it can be modified to be more suited to your purpose. We will be making extensive use of Perlin noise. I used GIMP to create my noise textures. If however you want to understand this process better, I suggest you look at this blog post by Gio, where he takes an in depth look at generating Perlin noise.
Our texture has 4 channels; red, green, blue and alpha. We are not going to create an image of a flame, instead we will generate it based on various noise textures and masks that we store in this single texture.
Red and Green Channels
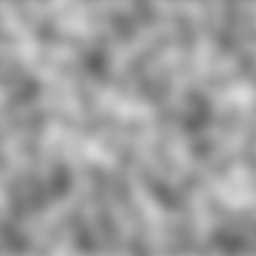
The red and green channels will each contain a noise texture. In our case we only need the flames to rise, so this noise only needs to be tileable on the y axis, however making it tileable on both is just as easy and gives us more flexibility. These two channels will be used to provide colour in our shader.
The Blue Channel
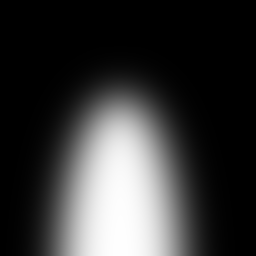
The blue channel is a bit special. This will contain the area we want our flames to occupy. If you were to get creative you could modify this channel to a shape more suited to your needs. This is often called an alpha mask, as we are using it to determine which things should and should not be drawn. In our case, we will simply blur an oval to provide our basic shape, our alpha mask.
The Alpha Channel
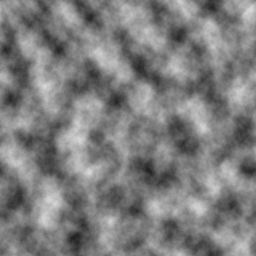
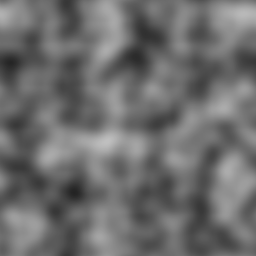
The alpha channel will be used for a third general noise texture. In our shader we will sample this noise at different scales and offsetes to provide us with more complex noise without requiring additional data. This noise is tileable, and if our effect doesn't look quite right, we can alter this noise and see the result.
In this project I used GIMP, a free image editing program to generate my textures. I exported them individually. The next step is to combine these images by using each one as a seperate channel in the final image. You can do this in GIMP, however I prefer Imagemagick for this purpose. A single simple command is all we need.
convert r.png g.png b.png a.png -channel RGBA -combine flame.png
Here is the texture we created using this process, feel free to use it.

Now we have our texture, lets create some fire! I will be using WADE for this, as the real-time shader preview makes things easy; but the same technique can be applied to vanilla WebGL (or OpenGL). The only difference is that instead of using the uDiffuseSampler and the uvAlphaTime vector provided by WADE, you'd have to pass these values to the shader yourself.
Like always, it is essential that we have easy access to the current time and our uv coordinates, so we first initialise variables for these.
    vec2 uv = uvAlphaTime.xy;
    float time = uvAlphaTime.w;
Fire by it's very nature is unpredictable, so we need need a similar level of randomness in our shader. I should note that although the effect will look random, it is actually perfectly deterministic. If you know the initial state, you can calculate all future states. In our case that means you could determine exactly what the flame would look like at a given time.
We are going to generate a set of coordinates that we will use to sample our red and green channels. To do this we first need to sample our alpha channel multiple times. We will take three samples for each coordinate.
    // Generate noisy x value
    vec2 n0Uv = vec2(uv.x*1.4 + 0.01, uv.y + time*0.69);
    vec2 n1Uv = vec2(uv.x*0.5 - 0.033, uv.y*2.0 + time*0.12);
    vec2 n2Uv = vec2(uv.x*0.94 + 0.02, uv.y*3.0 + time*0.61);
    float n0 = (texture2D(uDiffuseSampler, n0Uv).w-0.5)*2.0;
    float n1 = (texture2D(uDiffuseSampler, n1Uv).w-0.5)*2.0;
    float n2 = (texture2D(uDiffuseSampler, n2Uv).w-0.5)*2.0;
    float noiseA = clamp(n0 + n1 + n2, -1.0, 1.0);

    // Generate noisy y value
    vec2 n0UvB = vec2(uv.x*0.7 - 0.01, uv.y + time*0.27);
    vec2 n1UvB = vec2(uv.x*0.45 + 0.033, uv.y*1.9 + time*0.61);
    vec2 n2UvB = vec2(uv.x*0.8 - 0.02, uv.y*2.5 + time*0.51);
    float n0B = (texture2D(uDiffuseSampler, n0UvB).w-0.5)*2.0;
    float n1B = (texture2D(uDiffuseSampler, n1UvB).w-0.5)*2.0;
    float n2B = (texture2D(uDiffuseSampler, n2UvB).w-0.5)*2.0;
    float noiseB = clamp(n0B + n1B + n2B, -1.0, 1.0);
Incase you are wondering, most of the numbers above were determined via trial and error. This is different to almost all other programming where trial and error should never be a factor, probably why I find shaders so fun. I encourage you to play with the numbers yourself and see what happens.
So what does this code do. If we look at the top block with the comment noisy x value first, it will incidentally explain the second block. First we generate three offsets based on our uv coordinates. Notice that in all three, we move the y axis with respect to time, this provides the vertical movement we need to give the apperance of rising flames.
We offset and multiply both the x and y components of the uv coordinate. This essentially allows us to use the single noise texture in our alpha channel as multiple ones. We offset and multiple by marginally different values to reduce the chances our "scaled up" noise will line up with another sample or differently scaled noise.
We then use this offset when accessing the texture. Notice the -0.5 and multiplication by 2. This is to move the range of our alpha from -1.0 to 1.0. This is not strictly necessary however was needed in this case as our alpha texture was quite bright. It allows us to add or subtract values, depending on their values. If we just added values between 0 an 1, our resulting alpha would always be too bright.
    vec2 finalNoise = vec2(noiseA, noiseB);
    float perturb = (1.0 - uv.y) * 0.35 + 0.02;
    finalNoise = (finalNoise * perturb) + uv - 0.02;
We are almost ready to sample our colour texture. Before we do, we are going to provide some more randomness by distorting our noise coordinates by a greater amount at the top of the flame. This should help us get a more random flickering effect near the top and a more solid base for the flame near the bottom. Finally we add our modified noise to our uv-coordinates to produce the finished sample coordinates.
We finaly have an x and y coordinate we can use to sample our colour. This will appear very random visually due the the complexity of the process used to derive them, perfect for our fire.
    vec4 color = texture2D(uDiffuseSampler, finalNoise);
    color = vec4(color.x*2.0, color.y*0.9, (color.y/color.x)*0.2, 1.0);
    finalNoise = clamp(finalNoise, 0.05, 1.0);
    color.w = texture2D(uDiffuseSampler, finalNoise).z*2.0;
    color.w = color.w*texture2D(uDiffuseSampler, uv).z;
    gl_FragColor = color;
First we take our color sample, but due to the aforementioned trial and error nature of shaders they aren't quite right. Without some modification the flame looks a little dull and a little too green. This is why when we initialise the colour, we multiply red by 2.0 and marginally reduce the green, while adding a small amount of blue. This makes the flame much brighter and removes the nasty green patches that were present. You can play with these values to produce a whole host of colours.
The last thing we need to do is multiply by the alpha mask we stored in the blue channel. We do this in two stages. Firstly we use our finalNoise coordinates. This stops our flames from appearing solid and having no gaps, comment the line out to see the effect. Finally, we sample using our unmodified uv coordinates. This gives us the shape of the flame which is applied my multiplying the value by our current alpha.
There we have it, more fire than we could possibly need. Download the source and play with it yourself. You could change the colours and use it in a magical effect, or keep it as is and use it for a flaming torch. In most cases you'll want to set your sprite to Additive for a better effect. I encourage you to play around with the numbers and change the code to see what happens. I ended up with some rather intersting effects when I made mistakes or was just trying things out.
Many thanks to rastertek.com for sharing their DirectX implementation that inspired this.

