

Getting your HTML5 app on the play store may seem complex, but it's actually fairly simple.Lets break it down into nice simple steps.
- Build an Unsigned APK
- Test your unsigned APK on a suitable device
- Sign your apk
- Create a developer account
- Publish your App
Build an Unsigned APK
An APK is an Android Application Package. Building an apk is the process of converting your app code into a format that an android device can run. We will use WADE to build the apk, but you could use a number of other programs, such as android studio, or cordova phonegap.
The first step is to import your code into wade. Open Wade, create a new project, and add your files to it.. You need to make sure the first page of your app, usually index.html is in the root directory of your project. Though not required, it is probably a good idea to provide an app icon, this is the image you click on an android device to run your app. You can do this by adding a png image, icon.png to the root directory. Wade automatically searches for an image named "icon.png" when building to use as the default app icon.
Once you have imported your app files, click the download package button on the top bar (yellow folder with green arrow).

Select Android App.

This will upload your project to the build server. Once uploaded, the project will start building. You can check the progress by click on the cloud builds button on the top bar, it's the blue cloud. Once the build is done, there will be a download link in cloud builds.
Testing your APK
You should now have an unsigned apk. At this stage it makes sense to test your apk on an android device. There are two main ways of doing this.
The first method involves transferring the apk to your device via commonly available services, such as drop box, or email. Android normally prevents you from running apps like this, as you cannot be sure what you are actually running if it is not coming from an official source. Go to settings on your android device and find the security tab. There should be an option to enable third party apps. It may also be called enable unknown sources. In either case, you need to enable the option. This should allow your device to run the apk.
The second method requires you to enable developer options and then debug mode on your device. Go to settings and about. Tap the build version 7 times. This should open a prompt stating developer mode has been enabled. In the main settings menu you should now have a developer options tab. Open this and enable usb debugging. You will also need the android SDK. You can download the SDK itself, or you can download android studio which includes the sdk.
Once you have the SDK, navigate to the platform-tools folder. The right folder should contain a program called adb.exe. To make things easy, copy and paste your apk file into the folder. Open command prompt and navigate to the directory. You now need to connect your device to your computer. Make sure it is visible in windows explorer, this might require you to enter a pin on your device depending on your security settings.
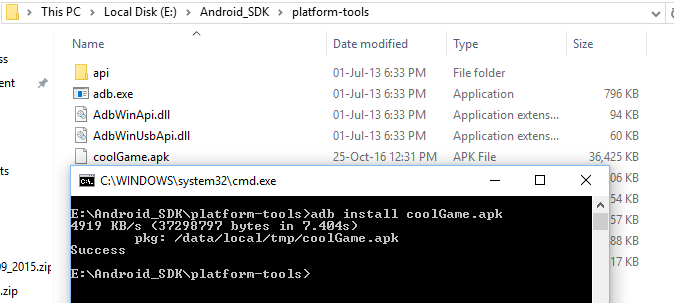
To install the app on your device, in the command window, type "adb install apkNameHere.apk". If all goes well, the installation should complete, and you should have a functioning app on your device. Test your app to make sure it is all working. If you notice things don't look right or are not working as you expect, now is the time to fix it.
Sign your APK
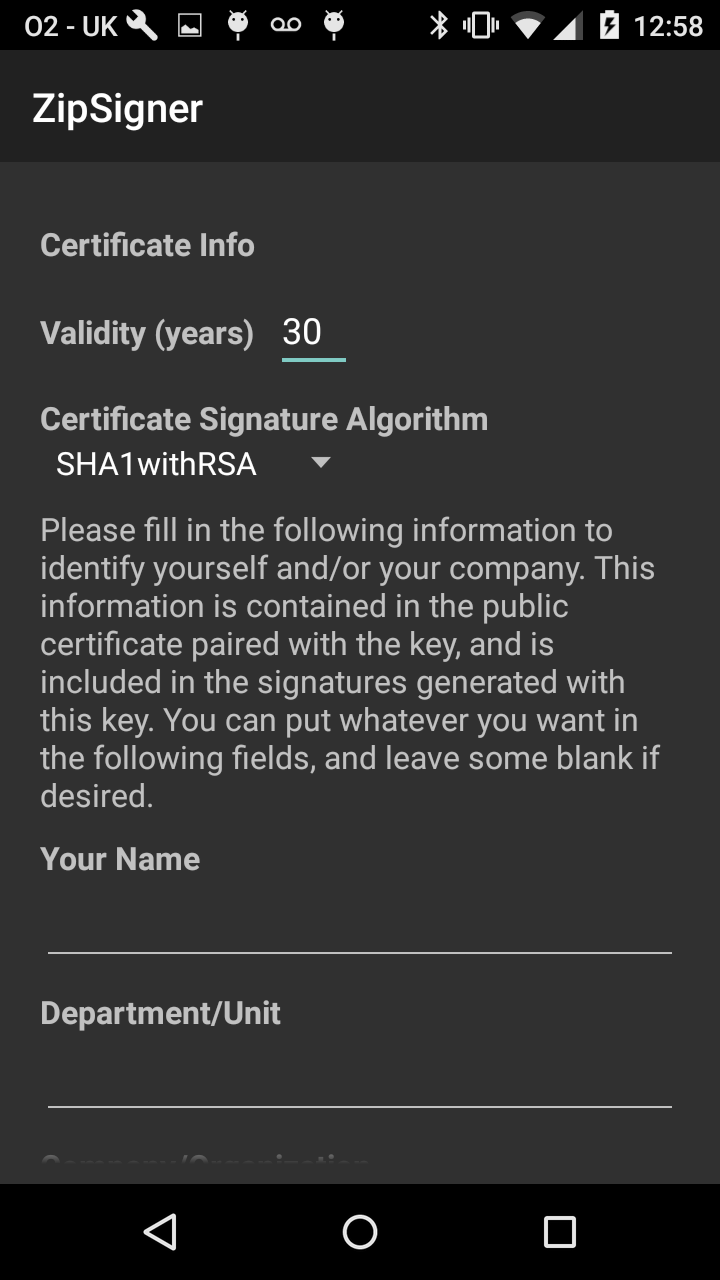
Once you have a working apk that you are happy with, it is time to sign it. I use an app to sign my APK's, mostly because it seems like less hassle than trying to import an HTML5 app into android studio. The app I use is called zip signer, by Ken Ellinwood, you can find it on the playstore . Once you have the app, open it, and click on the menu button in the top right, and select "my keys".
You will be looking at a mostly empty page. Click the menu button again and you should now have a new keystore option. This will guide you through creating a key that you can use to sign your app. Make sure to note down all passwords during this process.

Once your key is created, you need to copy your apk to your device. Using zip signer, you can now sign the apk using the keystore you just created. Once complete, you will find a signed apk on your device. Copy this apk back to your computer.

Create a developer account
To distrubute your app on the play store, you need a google developer account. The first step is to create a standard google account. If you already have a google account, you can just use that one. At time of writing, upgrading your google account to distribute apps has a one time fee of $25. You can upgrade your account here.
Publish your App

If you login to your developer account, you should be presented with an empty, all applications page. Click the add new application button. A dialog will appear asking you for a title and prefered language. This is where you upload your signed apk and then prepare your store listing. The rest is fairly straight forward. You will be asked to provide a description of your app, and screenshots of various sizes. Once you have entered all the information, you can publish your app.
Congratulations. You should now have an app on the play store that anyone can download and enjoy.

