
Overview
This is my third post in this series. Check out part 1 and part part 2 before reading.
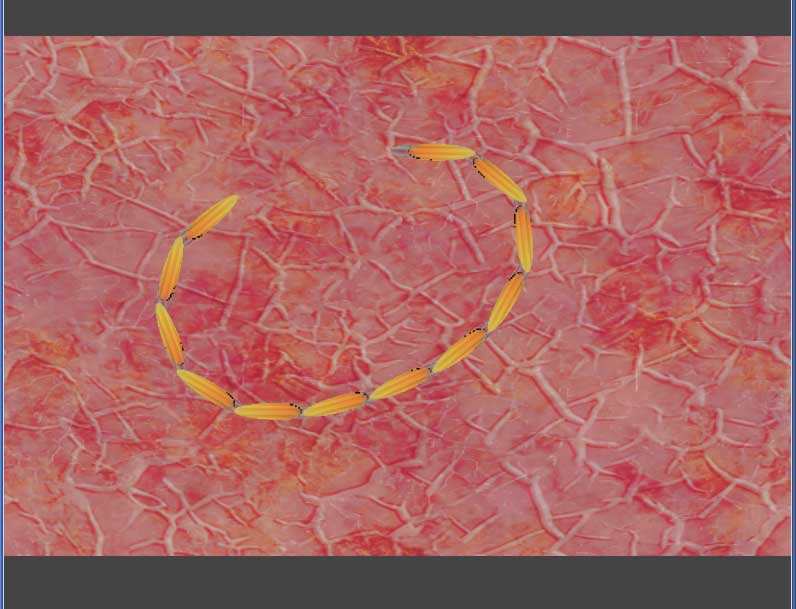
At the end, this is what we're trying to make. With the mouse or your finger, drag the worm around and eat the falling food particles. If you eat enough, the worm will grow another segment. Avoid the phages that attack the worm. If phages collide with the worm, it destroys part of it. I'll be breaking the project down into 5 steps. Each step will have its own html file and javascript file for you to look at for additional details.
Before I get started on this section, I want to make note of a couple of minor shader changes. I realized that the segment shader was not using the lightDir uniform, so I removed it. What I do want to vary though is how fast the texture "rotates" over the sprite. and the alpha of the sprite.
To that end, I added two uniforms called rotationSpeed and alpha. If you look in the sprite creation code for a worm segment or a food particle, (and later a phage) you will see the first two changes. If you look in the fragment shader code you will see how the uniforms are used.
	// these changes are made to the sprite creation code that use the fragment shader
	pixelShaderUniforms: {rotationSpeed: "float", alpha: "vec2"},
	properties: {rotationSpeed: 2., alpha: [1.,1.]},
	...
	// this change is made in the fragment shader code to use the rotationSpeed uniform
	float rot = uvAlphaTime.w * rotationSpeed;
	...
	// this change is made in the fragment shader code to use the alpha uniform
	vec4 inside = vec4(lightColor, alpha[0]);
If you could care less about what I just said, that is fine. Just make sure moving forward you start with the files attached to this blog post as your baseline.
Step 11 - Remove Segments with the Keyboard
OK, continuing from the previous blog, I'll begin with the three javascript files I ended with step10.js, segment10.js and AIManager10.js
Add this new bit of code to the onKeyDown, so when the 'r' key is pressed, a worm segment is removed.
            else if (wade.isKeyDown(82)) {
                console.log('r pressed - remove segment');
                self.removeSegment();
	    }
Right now I'm only removing the last segment and not allowing removal of the head to keep things simple and to make sure the segment removal code works correctly. As another simplification, I have commented out food creation in the gameManager function. Now, add the removeSegment function. I just check to see that the worm is longer than 1 segment, and if it is I remove the last segment from the worm array and the scene.
	    // remove a segment from the worm
            this.removeSegment = function() {
                if (worm.length > 1) {
	            console.log('remove segment');
		    var s = worm[worm.length-1];
		    wade.removeObjectFromArray(s,worm);
		    wade.removeSceneObject(s);
                }
	    };	// end removeSegment
Run the step11.html file. Press the 'a' key to add segments. Press the 'r' key to remove segments. The relevant javascript code is in step11.js, segment11.js and AIManger11.js
Step 12 - Add Phage with the Keyboard
Next, just like I did with food in the previous post, I am going to add phages. Ph...what ? If you don't know what a phage is, then check out this wikipedia page on phagocytes. Add the following lines to the onKeyDown function so that a phage is added when the 'p' key is pressed.
	    else if (wade.isKeyDown(80)) {
	        console.log('p pressed - add phage');
		aiManager.addPhage();
	    }
If you've been following along with the previous posts, you will see that adding phages is nearly identical to what I did when adding food. This time, I added the code right in the AIManager to begin with rather than adding it to the main and moving it later. The phages start on the left side of the screen, move across and then delete themselves using the onMoveComplete function. Keeping it simple like this will let me make sure the collision code works before making phage motion more complex just like I did previously with food particles.
Run the step12.html file and you should see one worm segment that rotates and them moves to the mouse position. Press the 'a' key to add segments to the worm.. Press the 'r' key to remove segments from the worm. Press the 'f' key to drop food particles. Press the 'p' key to add phages. The relevant javascript code is in step12.js and AIManager12.js
Step 13 - Phage Collision with Worm Segments
For now, I am going to say that the head of the worm is immune to phages. In a real game, this would probably be when the player 'looses a life', but for now I'll only allow body segments to be destroyed on phage collision.
In the gameManager function, I add a for loop to go through the body segments worm[1] to worm[length-1]. Then using wade, get any overlapping objects.
If the overlapping object isPhage, remove the phage and call removeSegment with the segment scene object to remove.
	    self.removeSegment(seg);            // remove the worm segment
            wade.removeSceneObject(overSeg[k]); // remove the phage scene object
Lastly, I make a modification to the removeSegment function so it can accept a segment. If a segment is passed into this function, then remove that segment. Otherwise the last segment is removed like on key press
            this.removeSegment = function(seg) {
	        ...
	        var s = seg || worm[worm.length-1];
	        ...
Run the step13.html file. Add some segments with the 'a' key. Then move the worm so it sits vertically in the middle of the screen. Launch some phages with the 'p' key. Watch them collide and destroy body segments. You'll notice that if the worm has a gap, it closes it once you move the head of the worm. I could've deleted all the segments from the gap to the end, or moved the segments immediately, but I like how the worm's body has just enough intelligence to re-make the connection. The relevant javascript code is in step13.js

Step 14 - Phages Dissolve Segments
I want the phage to latch onto the worm segment and make it appear to slowly dissolve it. To do that I have to make a couple of changes to a couple of files. Here goes...
The first file I'll modify is the segment behavior. I'll add some infection related attributes and the ability to set and get the infected attribute.
	    var infected = false;	// infected with a phage ?
	    var infectionTime;		// when was segment infected
	    var infectionLimit = 2;	// seconds till death if infected
	    ...
	    this.setInfected = function(val) { infected = val; };
	    this.isInfected = function() { return infected; };
Next, I'm going to make some changes in the game manager loop
	    if (overSeg[k].isPhage && seg.getBehavior().isInfected() == false) {
	        var sp = overSeg[k].getSprite().clone();
		seg.getBehavior().infect(sp);
		wade.removeSceneObject(overSeg[k]);
		break;
	    }
Inside the for loop, I am now checking that the segment has collided with a phage and that it is not already infected. If those two conditions hold, clone the sprite from the phage, call the segments 'infect' behavior with the clone and then remove the phage scene object.
This is what the infect function looks like in the segment behavior file.
	    // infect the segment with a phage
	    // the passed in sprite is added to this scene object
	    this.infect = function(sp) {
	        infected = true;		    // this segment has been infected
	        infectionTime = Date.now();	    // keep track of infection time so can die later
	        if (sp) {
	            sp.setSize(length,width);       // set new sprite to same size as current sprite
		    self.owner.addSprite(sp);	    // add it to the scnee object
	        }
	    };	// end infect
The onUpdate function (remember that is used to 'pulse' the segment body), is modified. Fade out all the sprites associated with this scene object. Check if the current time is longer than the infectionTimeLimit and if it is, remove this segment.
	// on update, check if the segment is infected
	// on update pulse the sides of the worm segment
	this.onUpdate = function() {
	    if (infected) {
		var currentTime = Date.now();
		this.fade();
		if ((currentTime - infectionTime)/1000 > infectionTimeLimit) {
		    wade.app.removeSegment(self.owner);
		}
	    }
	    else {
	        self.pulse();
	    }
	};  // end onUpdate
Run the step14.html file. Add some segments with the 'a' key. Launch some phages with the 'p' key. Watch them collide and stick to the body segments. The segments fade out and after 2 seconds (infectionTimeLimit) the segment is removed. You can change how long the segments live by changing this limit. If you want to change the fade rate, modify fadeStep. The relevant javascript code is in step14.js, segment14.js and AIManger14.js

Step 15 - Automatic Phages
One last modification I will make is to to automate phage creation. This is almost identical to what I did for automating food.In the main, make sure the dropFood code is uncommented and then add a dropPhage call.
            if (aiManager) {
	        aiManager.dropFood();
		aiManager.dropPhage(worm.length)
	    }
Then in the ai manager, add this function
	    AIManager.prototype.dropPhage = function(size) {
	        var l = size || 8;
		if (Math.random() * this.interval <= (this.chance/8 + l/8)) {
		    console.log('drop phage');
		    this.addPhage();
		}
	    };	// end dropPhage
Lastly, make some adjustments to the addPhage function so the motion is a little more random.
This final version is the same code that is running in the iframe at the top of this page. The relevant javascript code is in step15.js. segment15.js and AIManager15.js
Taking the segmented worm from my previous blog, it can now eat and be eaten. I hope you enjoyed this post.
Click here To download all the code for this project

