
JavaScript Memory Game Tutorial
This is a step-by-step guide to creating a simple memory-type game with WADE. You can download the full source code here.
1. Getting ready
Let's start by creating a new folder somewhere, and copying the WADE files into it. At the time of writing, the latest version of WADE is 0.9.1, so that's the one we're going to use. So download the zip file from clockwork chilli's website, and extract wade_0.9.1.js (or a newer version), index.html and style.css into your game folder. I am also going to create an empty images sub-folder in here. Next, we are going to create a new, empty file in this folder, called memory.js, which is going to contain our game. Now let's edit index.html and change the line that says:
// wade.init('test.js');
To:
wade.init('memory.js');
And in memory.js we are going to create our WADE App. So:
    App = function()
    {
    };
Inside the App function, we are going to create load and init functions, like this:
    App = function()
    {
        this.load = function()
        {

        };

        this.init = function()
        {

        };
    };
2. Drawing a card on the screen
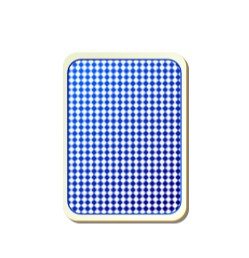
Now let's start by loading an image representing the back of a card. I got one off openclipart.org, which I have saved as a PNG file and placed in our game's images folder, calling it back.png. I have chosen a resolution of 128x173 for this image. So let's load it in the load function:
    this.load = function()
    {
        wade.loadImage('images/back.png');
    };
And now we are going to create an object for this card, and add it to the scene, in the init function:
    this.init = function()
    {
        var sprite = new Sprite('images/back.png');
        var card = new SceneObject(sprite);
        wade.addSceneObject(card);
    };
So when we run our game by opening index.html in a browser (see here how to set up your system if you have problems with this), we will see this:
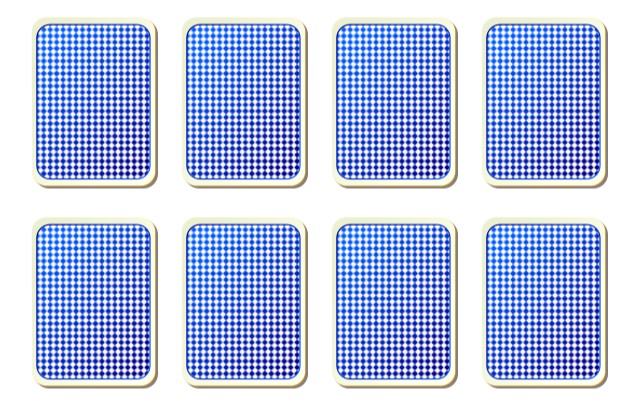
3. Drawing several cards on a grid
Now we want to add a few of these cards to the scene, and we want to place them in a 4x2 grid centered in the middle of the screen. So we'll define a couple of variables at the top, inside our App function:
    var gridSize = {x: 4, y: 2};
    var cellSize = {x: 150, y: 200};
And then we change our init function, so it contains two loops that iterate over the rows and columns of the grid, to create cards:
    this.init = function()
    {
        for (var i=0; i < gridSize.x; i++)
        {
            for (var j=0; j < gridSize.y; j++)
            {
                this.createCard(i, j);
            }
        }
    };
Of course now we have to create a createCard function, like this:
    this.createCard = function(i, j)
    {
        var x = (i - gridSize.x/2 + 0.5) * cellSize.x;
        var y = (j - gridSize.y/2 + 0.5) * cellSize.y;
        var sprite = new Sprite('images/back.png');
        var card = new SceneObject(sprite, 0, x, y);
        wade.addSceneObject(card);
    };
And now our game looks like this:
4. Adding animal pictures
The next thing to do, is to load some images to show under the cards. Again, I've taken 4 random pictures from opeclipart.org, and I've called them 0.png, 1.png, 2.png and 3.png, saving them into the game's images folder. We load them in the load function, right after loading back.png:
    wade.loadImage('images/0.png');
    wade.loadImage('images/1.png');
    wade.loadImage('images/2.png');
    wade.loadImage('images/3.png');
And in the init function, right after creating each card object, we create an object with one of these pictures (a random one each time).
    var index = Math.floor(Math.random() * 4);
    var animalSprite = new Sprite('images/' + index + '.png');
    var animal = new SceneObject(animalSprite, 0, x, y);
    wade.addSceneObject(animal);
And we get something like this:
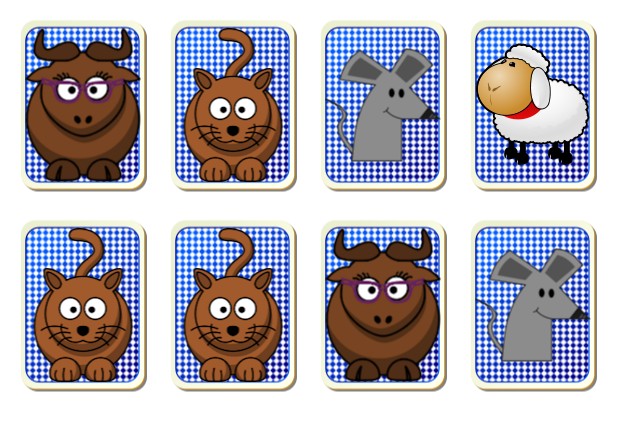
Obviously we have a problem here, because the animal pictures should be behind the card. One easy way to fix this, is to put the cards and the animals on different layers. Layers with higher numbers appear behind layers with lower numbers, so for example we could put the cards on layer 5 and the animals on layer 10, so they would be hidden by the cards. To do this, we just change the lines where we create the sprites, and add an extra parameter (the layer number) after the name of the image:
var sprite = new Sprite('images/back.png', 5);
and
var animalSprite = new Sprite('images/' + index + '.png', 10);
This will ensure that things are drawn in the right order. So far we've set up the grid with our cards, but the game is still doing nothing. Let's try to make it work. The first thing we need to do, is link the card with the index of the picture that's behind them. So after creating each animal, we can do this:
card.animalIndex = index;
So each card knows what's behind it, so to speak.
5. Gameplay logic
Now we want to let the user interact with these cards. Let's start with something simple: we are going to make the card invisible when it's clicked. We could make the card listen for onClick events, but in reality it's more convenient to listen for onMouseDown or onMouseUp events instead. This is because a click is defined as a user pressing and releasing the mouse (or its finger) in the same place. But we want this to work even if the user touches the card, moves his finger a bit, then releases it - although this is a common scenario on touch-screen devices, it isn't technically a click so the onClick event won't fire (unless we change the click tolerance). For this example, we are just going to use onMouseUp. So, at the end of the createCard function, we could do this:
    card.animalIndex = index;
    card.onMouseUp = function()
    {
        this.setVisible(false);
    };
    wade.addEventListener(card, 'onMouseUp');
If you go and play the game now, you will be able to make all the cards disappear as you click them. Of course this isn't quite what we want. We shouldn't be able to hide more than 2 cards at any one time. In fact, when we hide the second card, we want to see whether the animals behind the 2 cards that we have hidden are the same or not: if they are, we have made a match, and can go on clicking more cards, otherwise we just show the hidden cards again. To do this, it's probably convenient to have a variable, that we are going to call hiddenCards, to store references to the cards that we have hidden at any one time. We define this variable at the top of the file (but always inside the App function), for convenience. Initially, it's going to be an empty array:
var hiddenCards = [];
Now we are going to change the card's onMouseUp function a bit: when a card is clicked, we first check how many cards are currently hidden. If no cards are hidden, we can go on and hide the card, also adding it to the hiddenCards array. If 1 card is hidden, we hide the card (adding it to the hiddenCards array) and check if the animalIndex of this card and that of the hidden card match: if they do, we empty the hiddenCards array (meaning that it's ok to go on clicking cards), and if they don't match, we still empty the hiddenCards array, but only after showing all the cards that were in it. So the card's onMouseUp function will look like this:
    card.onMouseUp = function()
    {
        if (hiddenCards.length == 0)
        {
            // hide the current card
            this.setVisible(false);
            hiddenCards.push(this);
        }
        else if (hiddenCards.length == 1)
        {
            // hide the current card
            this.setVisible(false);
            hiddenCards.push(this);

            // see if it matches the card that was already hidden
            if (hiddenCards[0].animalIndex == hiddenCards[1].animalIndex)
            {
                hiddenCards.length = 0;
            }
            else
            {
                // no match, so show both cards again
                hiddenCards[0].setVisible(true);
                hiddenCards[1].setVisible(true);
                hiddenCards.length = 0;
            }
        }
    };
If you try the game now, you'll see that it's fully functional, but there is a big problem: when you click the second card, and it is not a match, you don't actually see what was behind it, because it's hidden and then set back to visible immediately. So we may want to change that last bit (where it sets the hidden cards back to visible), and delay it by 1 second or so. Luckily, this is extremely easy in JavaScript, using a setTimeout function:
    // no match, so show both cards again
    setTimeout(function()
    {
        hiddenCards[0].setVisible(true);
        hiddenCards[1].setVisible(true);
        hiddenCards.length = 0;
    }, 1000);
And now it's much better. If you play the game at this point, you'll see that it works great - but there's one more important problem: we are just showing random animal pictures behind the cards, and this isn't exactly like a memory game works. In reality, we should have 4 different pairs of animals, otherwise the game is going to be impossible to complete. There are several different ways of doing this, but a simple one is the following: we create an array, and initialize it like this (I am doing this at the top of the App function):
var indices = [0,0,1,1,2,2,3,3];
And then at the beginning of the init function we scramble this array, i.e. we select a random item from the array, and swap it with another random item in the array. We repeat the process a few times (I'll do it 10 times here).
    for (var k =0; k<10; k++)
    {
        var a = Math.floor(Math.random() * indices.length);
        var b = Math.floor(Math.random() * indices.length);
        var temp = indices[a];
        indices[a] = indices[b];
        indices[b] = temp;
    }
And when we create the animal objects, we just want to use indices from this array, rather than generating random ones:
    var index = indices[i + j * gridSize.x];
    var animalSprite = new Sprite('images/' + index + '.png', 10);
Try the game now, and you'll see that it works great - this time for real.
6. Setting a background and resolution limits
We already have a functional game, but I'm sure that there's lots we could do to make it look prettier and more interesting. A quick thing to do that would improve the appearance of our simple game is a nice background. I am going to use a picture for it, although you could achieve the same effect using WADE's vector graphics functions (and it would only be 2 lines of code, but let's keep things simple here). So I created this bg.jpg file, and I'm copying it into the game's images folder. Then we load it, in the load function:
wade.loadImage('images/bg.jpg');
And at the bottom of the init function we add it to the scene. Now we could add it to yet another layer, to make sure that it appears behind anything else. But remember that each layer is a separate canvas object, and you probably don't want to create too many of those, to save memory. So I'm going to use a different trick: I add it to layer 10 (the same as the animal sprites), and then I push it to the back of the layer:
    var bgSprite = new Sprite('images/bg.jpg', 10);
    var background = new SceneObject(bgSprite);
    wade.addSceneObject(background);
    bgSprite.pushToBack();
You'll notice that the size of the background picture is 708x398, which is exactly the size of the window where this demo is going to appear on Clockwork Chilli's website. In fact, the whole game (the size of the cards, etc.) has been designed to work well at that particular size. So what do we do for users that have screens with lower resolutions? We need to scale the game down, so it works for them too! Luckily WADE takes care of this for us, the only thing we need to tell it is the minimum resolution that our game supports (in this case 708x398). So at the top of the init function:
wade.setMinScreenSize(708, 398);
Now try resizing the window of the browser where the game is running, to make it smaller, and you'll see that WADE automatically scales the game down, while preserving its aspect ratio. So what happens when users have a screen that is larger than the resolution that we are using for our game? At the moment they'll see just a white background, with the game running in a 708x398 rectangle in the middle. Of course we can change this too, in much the same way, telling WADE to scale up for screens larger than 708x3980:
wade.setMaxScreenSize(708, 398);
So in this case we are working at a fixed resolution, with WADE scaling things up and down. But in general, the minimum and maximum resolutions don't need to be the same: you can set different values for them, and WADE will apply some cropping in-between.
7. Simple particle effects
Another thing that would be nice is some kind of particle effect that appears when we make a correct match, as a kind of positive feedback for the player. I am adding sparkle.png to our game's image folder. This is an 8x4 spritesheet that contains an animation made of 32 frames. As usual, we load the image in the load function:
wade.loadImage('images/sparkle.png');
Now let's create a new member function of App, that we are going to call createParticle, where we define an animation that uses the sparkle spritesheet:
    this.createParticle = function(position)
    {
        var animation = new Animation('images/sparkle.png', 8, 4, 30);
    };
And of course, after creating the animation, we want to create a sprite that uses it. We also want to choose a random size for this sprite, say anywhere between 20 and 60 unit. Then we will also need a scene object that contains this sprite, so we can add it to the scene:
    var size = Math.random() * 40 + 20;
    var sprite = new Sprite();
    sprite.setSize(size, size);
    sprite.addAnimation('sparkle', animation);
    var particle = new SceneObject(sprite, 0, position.x, position.y);
    wade.addSceneObject(particle);
    particle.playAnimation('sparkle');
Now let's make it move. We'll need to choose a random speed (let's say between 20 and 50 units per second), and a random direction vector. We will also need to normalize this direction vector, so it's 1 unit long:
    var speed = Math.random() * 50 + 20;
    var direction = {x: Math.random() * 2 - 1, y: Math.random() * 2 - 1};
    var length = Math.max(Math.sqrt(direction.x * direction.x + direction.y * direction.y), 0.0001);
    direction.x /= length;
    direction.y /= length;
And now we can tell the particle to move in this direction:
particle.moveTo(position.x + direction.x * 1000, position.y + direction.y * 1000, speed);
One last thing we want to do with our particle, is deleting it when the animation is finished, like this:
    particle.onAnimationEnd = function()
    {
        wade.removeSceneObject(this);
    };
OK, so all that's left to do is actually calling this createParticle function. We'll do this from the card.onMouseUp function, specifically when it checks to see if we've made a valid match. I am going to create 5 particles for each of the cards that make the valid match, like this:
    if (hiddenCards[0].animalIndex == hiddenCards[1].animalIndex)
    {
        for (var i=0; i<5; i++)
        {
            wade.app.createParticle(hiddenCards[0].getPosition());
            wade.app.createParticle(hiddenCards[1].getPosition());
        }
        hiddenCards.length = 0;
    }
8. Game over and restart
Now the game is looking a bit better, but the fact that you have to refresh to play again is a bit inconvenient. So we should probably keep track of how many matches have been made and, when all 4 matches have been made, the game is over and we restart it. So let's create another variable at the top of our App function:
var numMatches;
And in the init function, we initialize it to 0:
numMatches = 0;
Then, just after spawning our particles as a consequence of a successful match, we increment this variable and check to see if it's equal to 4. If it is, we set a timeout to restart the game (i.e. we clear the scene and call the init function again):
    if (++numMatches == 4)
    {
        setTimeout(function()
        {
            wade.clearScene();
            wade.app.init();
        }, 2000);
    }
9. Fade in effect
Now another thing that we could improve, is the way in which we start the game. It would be nice if we could deal the cards slowly, rather than making them appear all at the same time. This is easy to do: in the init function, in the loop that calls createCards, we just introduce some delay before each card is created, like this (by the way, I'm also inverting the loop so we iterate over all the rows, and then over all the columns in each row, because it looks nicer this way):
    var delay = 0;
    for (var i=0; i < gridSize.y; i++)
    {
        for (var j=0; j < gridSize.x; j++)
        {
            this.createCard(j, i, delay);
            delay += 150;
        }
    }
So I'm adding 150 milliseconds to the delay for every card that is created. You'll notice that I'm passing this extra delay parameter to the createCard function. So let's change the createCard function to use it:
    this.createCard = function(i, j, delay)
    {
        setTimeout(function()
        {
            // all the code that we already had in this function
        }, delay);
    };
So I am not changing much, I am simply moving all the code that we already had in the createCard function inside another (anonymous) function, that is executed with some delay. If you try the game now, you'll notice that the cards appear in sequence, which is a nice touch, and was very simple to do. But wouldn't it be even nicer if the cards faded in, rather than appearing instantly? It turns out, that's quite easy to do too: after adding a card to the scene, we can change the draw function of the card sprite. This is a rather advanced feature of WADE: sprites get drawn with a predefined draw function (that determines where they end up on the screen and what they look like, handles animated spritesheets and so on). However, WADE gives you the ability to override that with your own draw function, so you could use all the low-level HTML5 API to draw whatever you like (vector graphics and so on). But it's even better than that: WADE comes with a collection of pre-defined draw functions, that you could put together to create a variety of interesting effects with minimal effort. This is precisely what we're going to do now, using a draw function that changes the opacity of our sprite over time:
sprite.setDrawFunction(wade.drawFunctions.fadeOpacity_(0, 1, 0.5, sprite.draw));
Basically, we are using a function that slowly changes the opacity from 0 to 1, in 0.5 seconds, and is applied as a modifier of sprite.draw (that is, the original draw function of our sprite). This is pretty cool, but if you try it now, you'll see that there is a problem with it: the animal pictures are added to the scene at same time as the card. But the card, for a brief moment, is transparent, so you can see what animal is hiding behind it! In reality, this may even be an interesting “feature” of the game, as it eliminates the luck factor from the memory game, but we'll fix it anyway, to make it behave as most people would expect. The trick here, is that we don't need to add the animal to the scene at the same time as the card. Instead, we can wait until the card is completely visible, then add it to the scene. And again, this is really easy to do, because we can just pass an additional parameter to the fadeOpacity_ draw function: this additional parameter is another function to execute when WADE is finished with the opacity transition. So, after removing the line that adds the animal to the scene, we re-add it here:
    sprite.setDrawFunction(wade.drawFunctions.fadeOpacity_(0, 1, 0.5, sprite.draw, function()
    {
        wade.addSceneObject(animal);
    }));
10. Adding sounds
With all these little touches (that took literally minutes and a couple of lines of code to make), the game is starting to look like a professional product. But let's make it even better by adding sound to it. If you have been using HTML5 for a while, you'll now that sound is very poorly supported on some devices. The main problem is that on some mobile operating systems and browsers, sounds won't even be loaded unless the loading is user-initiated (i.e. unless they are loaded in response to a user click). This means that we cannot really load sounds in the same way as we load images, in the load function with wade.loadAudio(). Or rather we could do that, but then the game wouldn't work at all on some Android browsers, or on older versions of iOS. This is because, for each thing that we load in the load function, WADE waits until it's finished loading before executing the init function of our app. On some browsers, this will never happen: the sounds won't be loaded, and the game will be stuck in the load function forever.
There are multiple solutions to this problem, and the simplest one is using wade.preloadAudio() rather than wade.loadAudio(). The preload functions of WADE are used to load things in the background (you can do this with images, json files and scripts too). The difference is that when you use wade.loadAudio(), the game is paused until the audio has been loaded, whereas with wade.preloadAudio() the game is not paused and just carries on normally, with audio being loaded in the background. So now I'm going to create a new sub-folder in our game's folder, calling it sounds, and in this folder I'm placing the following ogg files: right.ogg and wrong.ogg. I want to play these when the player makes a right and a wrong match respectively. I am also going to make aac versions of these 2 files: right.aac and wrong.aac. This is because some browsers support one format, some other browsers support the other. However you don't have to worry about this, just place both version in the same folder, and WADE will pick the right one for your browser. Now we load these files in the sound folder, in our load function:
    wade.preloadAudio('sounds/right.ogg');
    wade.preloadAudio('sounds/wrong.ogg');
You'll notice that I'm loading the ogg version, but WADE will instead try to load the aac for browsers that don't support ogg. Now, since we are preloading these sounds rather than loading them, it's possible, on a particularly slow connection, that the sounds won't be available when we try to play them. So we use WADE's convenient playAudioIfAvailable function to play the sounds. If the sounds haven't finished loading for whatever reason when we try to play them (maybe because the browser stops them from loading), they simply won't play, but the rest of the game will work normally. So when the user makes a right match (in the card.onMouseUp function):
wade.playAudioIfAvailable('sounds/right.ogg');
And for a wrong match:
wade.playAudioIfAvailable('sounds/wrong.ogg');
And this concludes this simple memory game. Even considering comments, it's just over 150 lines long and took a very short time to make. It's a bit basic, but I'm sure you'll be able to use it as a starting point to make something awesome!

