
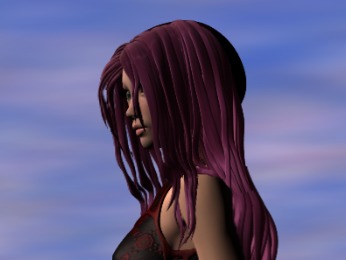
I have been watching a lot of Japanese anime recently, and while I do watch them for the beautiful visuals, story, characters, humor and all that, one thing always stands out and has become a minor obsession of mine: anime hair.
You know those hair strands always moving in the wind, that make static drawings look so dynamic, adding a very dramatic effect to the scene just with a simple animation.
Being curious, I wanted to replicate the effect in a simple HTML5 demo, and started doing some research, reading about what people do to achieve that effect.
Unsurprisingly, this boils down to drawing and animating each hair strand separately, and manually. I am sure that this is THE way to do it, and if you are after a professional result you should do it this way. However this is BORING.
If you have read my other blog posts, you know me by now... I don't like boring, repetitive manual work. I like to do things using some interesting maths instead.
So I started thinking... surely I could write a simple WebGL shader to simulate the process with some basic maths? Well, here's the result - judge for yourself. Oh and make sure to look at it in to see it better.
So how did I do that?
The idea is pretty simple - you do need to cut your sprite's hair into separate strands, so you no longer have one single sprite, but many sprites, like so:


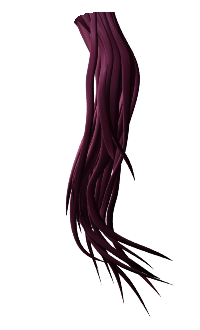

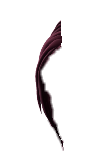

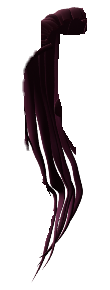

The more you cut, the better the effect. But again, BORING. I stopped at the 10th strand.
As you can see, since I want some hair animating behind the girl's arm, I have also cut out the arm from the base sprite, and placed it in front of some of the hair strands, but behind others.
Once you have these strands, the basic principle is that you want to apply some time-dependent sinusoidal distortion to the image.
If this was a uniform distortion on one axis, it would be very simple to do. Given a frequency (how quickly the hair strand oscillates) and amplitude or strength of the effect (how much it moves), the shader would look like this:
vec2 uv = uvAlphaTime.xy;
float t = uvAlphaTime.w;
float frequency = 10.;
float strength = 0.1;
float d = sin(t * frequency) * strength;
uv.x += d;
vec4 color = texture2D(uDiffuseSampler, uv);
gl_FragColor = color;
As usual this is done in WADE, where you have this uvAlphaTime vector that you can use to get the current UV (i.e. texture coordinates) and the time (plus the sprite's alpha, which we don't need right now). If you wanted to do this in another framework, you would have to pass those values to your shader somehow, but the basic principle remains.
Anyway, a uniform sinusoidal distortion is not what we want. We want the bottom part of the hair to move more, while the top part should not move at all. Therefore we want to scale the strength of the effect by the vertical coordinate:
d *= uv.y;
This gets us a little bit closer, but we could easily improve the effect by doing the following:
- Define a cutoff point - pixels above that point will not move at all, pixels below it will move more and more the farther down we get
- Don't scale linearly, use some power of uv.y (I ended up choosing cubic)
- Add an offset (or phase) parameter so that not all strands move in sync, which would look weird
- Make the motion more interesting by adding some variance to the sinusoidal distortion
Finally, while writing this it occurred to me that I could easily reuse the same shader for other effects, such as grass moving in the wind. However, in that case, it would have to be flipped, i.e. the bottom part would stand still, the top part would move.
So I added a direction variable (which should be either 1 or -1), to easily be able to reuse the shader for other purposes.
After doing all that, I ended up with this code
const float direction = -1.;
const float variance = 2.;

float frequency = params.x;
float strength = params.y;
float offset = params.z;
float cutoff = params.w;

vec2 uv = uvAlphaTime.xy;
float t = uvAlphaTime.w;
float d = sin(t * frequency + offset);
d = (1. - pow(d, variance)) * direction;
d *= strength;

float v = (uv.y + cutoff) * 2. - 1.;
v = mix(min(v, 0.), max(v, 0.), cutoff);
uv.x += d * v * v * v;
vec4 color = texture2D(uDiffuseSampler, uv);
gl_FragColor = color;
As you can see, for performance reasons, I grouped all parameters into a single vec4, called params.
And I liked the end result - but I quickly realized that the scene was looking odd. Because once the hair was moving in the wind, having a completely static skirt was looking super-weird.
I used a very similar idea for the skirt, however I felt that I had already spent enough time cutting sprites, so I didn't want to modify the original image. Luckily in this particular example, the geometry of the character sprite (with bits of the skirt sticking out at both the left and right edge of the image) allowed me to easily define an effect that would only affect the edges of the sprite, leaving the rest (i.e. the body and face) unchanged.
Here's the shader code for the windy skirt, in case you need it. I can think of quite a few possible uses, but I'll keep this blog post professional and won't list them here - you use it as you like :)
const float strength = 0.05;

vec2 uv = uvAlphaTime.xy;
float t = uvAlphaTime.w;
float rightEdge = 0.8;
float leftEdge = 0.1;
float s = sin(t);
uv.x += s * s * strength * (uv.x > rightEdge? 1.: 0.);
s = sin(t * 0.7 + 0.5);
uv.x -= s * s * strength * 0.3 * (uv.x < leftEdge? 1. : 0.);
vec4 color = texture2D(uDiffuseSampler, uv);
color.w = uv.x >= 1. || uv.x <= 0.? 0. : color.w;
gl_FragColor = color;
For the background, I recycled a demo that I had made some time ago for this blog (moving clouds shader).
As usual, feel free to download the WADE project and play with it.

