
Having read Gio's blog post 3d shaders in a 2d world where he makes a 3d planet, I had to have a play myself.
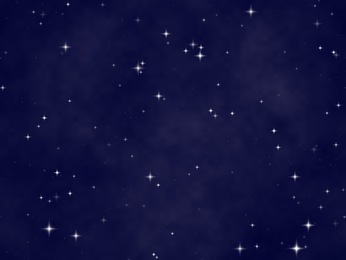
Having spent two hours agonizing over what to make, I decided on a cool space background. Weeks could happily be spent on this, shaders have an almost addictive quality to them. Instead I only had a very short time to do this, and that is actually a good thing, it saves me from myself. The result can be seen below. I really wanted a moon (or Spacestation) orbiting the planet, however I ran out of time. But feel free to download the project and add more things to it.
The first job was to decide what I wanted in the scene. I settled for a static background of the milky way galaxy, some twinkling stars, a nebula and rotating planet. To add all these elements we will use two layers. Layer 1, which is on top, will contain all the sprites that use a shader. Layer 1 has to be drawn every frame so we see the changing output of our shaders. Layer 2 will only hold the static milky way background image, having this on a seperate layer means it does not have to be redrawn every frame, saving a nice number of cycles.
I decide to create my elements based on distance from the camera. The static background is further away, so I open up the wade editor, and add the background image to layer 2.

Now for the fun stuff, making the twinkling star shader. I debated on whether or not to create the initial texture for the stars in WADE. While this would be an easy task, I decided instead to create the texture in GIMP. Almost any program could be used. The texture was completely empty, fully transparent and I just added individual pixel sized white dots randomly to the image. The star shader, is where we make this bunch of boring dots more interesting.
	float time = uvAlphaTime.w;
	vec2 uv = uvAlphaTime.xy;
	float w = 1.0/990.0;
	float h = 1.0/620.0;
	float w20 = floor(uv.x*20.0);
	float h20 = floor(uv.y*20.0);
	float rand1 = time + (153.2*w20/(h20+1.73));
	float rand2 = time + (153.2*h20/(w20+1.73));
	vec4 color = texture2D(uDiffuseSampler, uv);
The above is just the house keeping part of the shader, useful things like assinging the current time to a variable however w,h, rand1 and rand2 require some explanation.
Assume we want our stars to sparkle. We could do this by taking sin(time) and using it as a brightness value. This would work, however because the time will be the same for all pixels, all of our stars would flicker at the same time. This does not look good, try it for yourself.
The solution is to offset time by a random amount, an amount that is different for every star, this is where our values come in. For simplicty, this shader is designed to work at 990px x 620px resolution. To make it work at any value, you would add shader parameters for the screen size and adjust your textures accordingly.
	float uvX20 = floor(uv.x*20.0);
	float uvY20 = floor(uv.y*20.0);
Multiplying the current uv co-ordinates by 20 and floring the result creates an interesting effect. Say we have 2 x co-ordinates 0.06 and 0.07. When multiplied by 20, they become 1.2 and 1.4 respectively. When we floor these values, they both become 1. Esentially each 20 by 20 group of pixels will have the same value for uvX20 and uvY20 that we have calculated. This allows us to affect all the pixels in this area together more easily, because they all share a certain value. To better understand this, see the picture below. In this image I set the nebula texture to the star shader, and instantly the blocks of 20 become visible.

Now that we have these blocks, we can create a pseudo random number to animate stars in that area.
	float rand1 = time + (153.2*w20/(h20+1.73));
	float rand2 = time + (153.2*h20/(w20+1.73));
This code takes the time, a value that changes every frame, and offsets it by an amount based on the x and y co-ordinates of our local block that we calculated before. You may ask what happens if a star lies on the border of a block. The answer is both halves of the star will twinkle at different times. You can get around this be desinging your star texture so that no stars are too close to the grid lines on our hypothetical grid, but I didn't consider that at the time. Regardless, the artifacts produced seem very rare and mostly un-noticeable.
So we have the values we need but how do we create our twinkle I hear you say. For that I'm afraid we need 2 more values. We need to know the value we can add to our uv co-ordinates to get adjacent pixels, in the shader I have called these w and h.
	float w = 1.0/990.0;
	float h = 1.0/620.0;
Almost all values, including pixel co-ordinates are normalized. So to calculate the co-ordinates of a pixel in our texture, we need to find the normalized size of one pixel. This is done by taking one, dividing it by the width, and then in another variable, the height. So if I want a pixel that is one to the right of the current uv co-ordinates, I have to add this value I have stored in 'w'.
Now we really do have all the values we need, I promise :). For every pixel, we check 2 pixels in each direction. If one of the pixels has a white dot, it is a star on our texture. This value gets added to our current colour value, though it is decreased based on its distance from the actual pixel we are currently processing. The intesity of these colour values is multiplied by the sin of our random block value so they appear and disappear with time, creating a simple twinkling effect.
	// Sparkle stars x
	vec2 neighbour = uv;
	neighbour.x += w;
	color += texture2D(uDiffuseSampler, neighbour)*0.75*clamp(sin(rand2*3.0), 0.1, 1.0);
	neighbour.x += w;
	color += texture2D(uDiffuseSampler, neighbour)*0.5*clamp(sin(rand2*3.0), 0.1, 1.0);
	neighbour = uv;
	neighbour.x -= w;
	color += texture2D(uDiffuseSampler, neighbour)*0.75*clamp(sin(rand2*3.0), 0.1, 1.0);
	neighbour.x -= w;
	color += texture2D(uDiffuseSampler, neighbour)*0.5*clamp(sin(rand2*3.0), 0.1, 1.0);

	// Sparkle stars y
	neighbour = uv;
	neighbour.y += h;
	color += texture2D(uDiffuseSampler, neighbour)*0.75*clamp(sin(rand2*3.0), 0.1, 1.0);
	neighbour.y += h;
	color += texture2D(uDiffuseSampler, neighbour)*0.5*clamp(sin(rand2*3.0), 0.1, 1.0);
	neighbour = uv;
	neighbour.y -= h;
	color += texture2D(uDiffuseSampler, neighbour)*0.75*clamp(sin(rand2*3.0), 0.1, 1.0);
	neighbour.y -= h;
	color += texture2D(uDiffuseSampler, neighbour)*0.5*clamp(sin(rand2*3.0), 0.1, 1.0);
There is one last thing to do in our star shader. We need to subtly shift the color with time to create a more interesting effect. We will use our unused rand1 value for this task. To alternate the stars hue from red to blue, we will reduce the value of the other colours to produce the imbalance.
	color.yz = color.yz*clamp(sin(rand1*5.0), 0.5, 1.0); // Reduces green and blue to create red
	color.xy = color.xy*clamp(cos(rand1*5.0), 0.5, 1.0); // Reduces red and green to create blue
	gl_FragColor = color;
There you have it, some nice twinkling stars on a milky way background, but there was talk of a nebula I here you cry. I also imagine I will get some flack from putting a nebula inside a solar system, I do know my space stuff, I just wanted a reason to have space gas :). Or maybe the planet we will add later is rogue and not part of a system... lets go with that.
The nebula image is a composite of three different noise textures I quickly generated in an image program. Normally I would spend a good deal of time on this part to get the shapes I want, but with limitted time I had to bring something basic together quickly. Here is what the image looks like, do not worry. Our finished nebula will look nothing like this, you did see the finished product at the start remember, have faith, we will get there.

I add the image to a scene object, also on layer 1 but rendered in front of the stars. The nebula shader requires a lot less setup than the twinkling stars. We don't need to calculate a bunch of values, we simply need to read our composite texture with lots of random offsets animated by time. By combining multiple animated samples together, we create an effect that can be used to make fire, water, clouds or in our case, a nebula. Or is it random space gas. This is starting to bother me now but who cares, it will look good.
	float time = uvAlphaTime.w;
	vec2 uv = uvAlphaTime.xy;
	vec4 color = vec4(0,0,0,1);

	vec4 s0 = texture2D(uDiffuseSampler, uv + 0.3 * vec2(time * 0.02));
	vec4 s1 = texture2D(uDiffuseSampler, uv + 0.5 * vec2(time * 0.05));
	vec2 uv2 = uv;
	uv2.x -= (time * 0.02);
	vec4 s2 = texture2D(uDiffuseSampler, uv2);
The first part of the shader is simple. We do our house keeping again, assinging values for time, our uv co-ordinates, and an inital color. Three samples from the texture are then taken at offsets specified by time. The time offsets are applied in different directions to avoid a flow and hopefully create a more random mixture of gasses look. If you were creating a river or something like that, you would probably apply your offsets in the same direction, rivers rarely flow up hill after all.
I then specified the colours I wanted the nebula to be. This took a lot of tweaking and I hope you have fun playing with the values, you can create all sorts of crazy things. Three vec4 components were added named col0, col1 and col2. The values I used for these are as follows.
	col0 0.9 0.45 0.9 0

	col1 0 0.3 1 0

	col2 0 0 1 0
	vec4 c0 = mix(col0, col1, s0.x);
	c0.w = s2.w*0.1;
	vec4 c1 = mix(col2, col1, s1.y);
	c1.w = s0.x*0.05;
	vec4 c2 = mix(col2, col0, s2.z);
	c2.w = s0.y*0.3;
	color = clamp((c0 + c1 + c2), 0.05, 1.0);

	gl_FragColor = color;
Using the colours we just created, we mix and interpolate them with our texture samples. Given that our texture is a composite of noise textures, this should give the apperance of mostly random movement which is what we want. We add our 3 generated colours together, in a clamp to keep the values within a reasonable range and hey presto, we have a nebula.
Now for the final touch, a planet. I wish this didn't have to be the final touch but I'm completely out of time. I'm not going to explain the planet in detail, as we are essentially stealing it from Gio's blog post on creating a 3d planet.

The code for the planet was taken straight from Gio's blog post. I used a different image as you can see above. All I had to do was create a final scene object in my project, add the sprite using the image you can see above and then position and rotate the planet where I wanted it.
float rot = uvAlphaTime.w * 0.005;
I did change this line of code. Originally the 0.005 value was much higher but I wanted a much slower spin so I decreased it. I really wish I had more time for this. You could have random thunderstorms on the planet, atmospheric glow, moons, death stars... unleash your imagination!

